Course Plan
After the course creation (find more in Course table) you need to make a Course Plan by adding the necessary materials and resources to the course, and set up settings for them.
You can switch to Course Plan by clicking on the following button in the list of courses.

The Course Plan page contains tools for searching for learning resources and generating a list of resources in the Course Plan. The page is divided into two blocks: on the left - buttons and fields for searching and adding resources, on the right - the list with the added resources and tools for editing them.
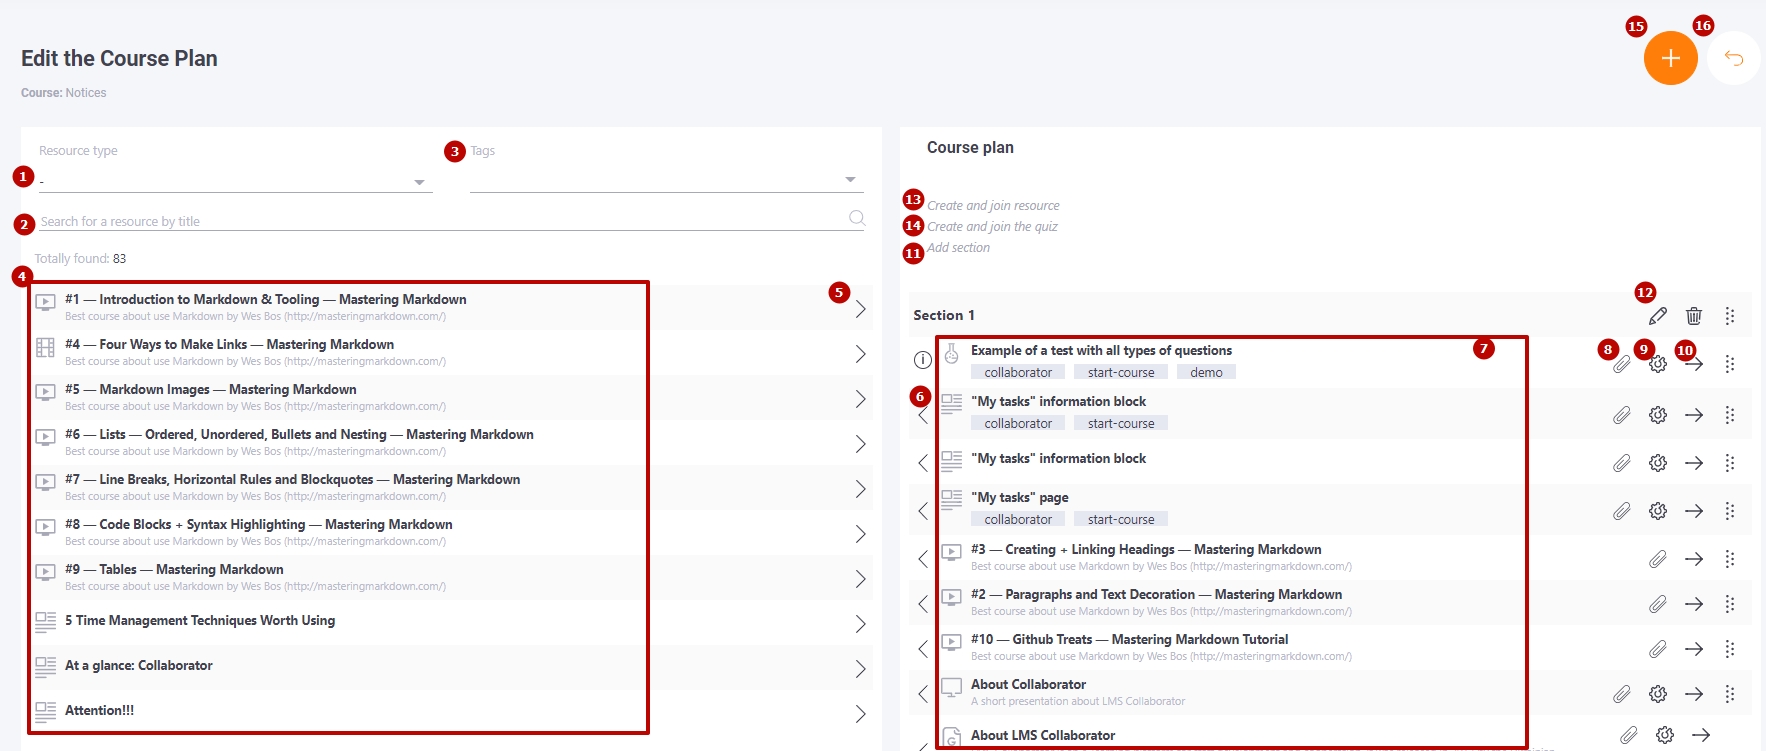
The following fields are used to search for resources:
(1) - Resource type - resources filtering by their type;
(2) - Search for a resource by title - search by words and phrases from the title and description;
(3) - Tags - search by tags for resources, tests, workshops, and surveys.
Only published resources, quizzes, surveys and workshops can be added to the Course Plan. The list (4) shows the first 10 resources in the list alphabetically. To search for and add all other learning resources, use the search fields (1, 2, 3)
Add (5) button moves the learning resources to the right-hand list in the Course Plan. Each subsequent resource is added to the end of the list.
Remove (6) button removes learning resources from the Course Plan.
(7) - a compiled list of the Course Plan - displays the title, description and tags for the learning elements and the control tools for each element.
(8) - button for adding Additional materials
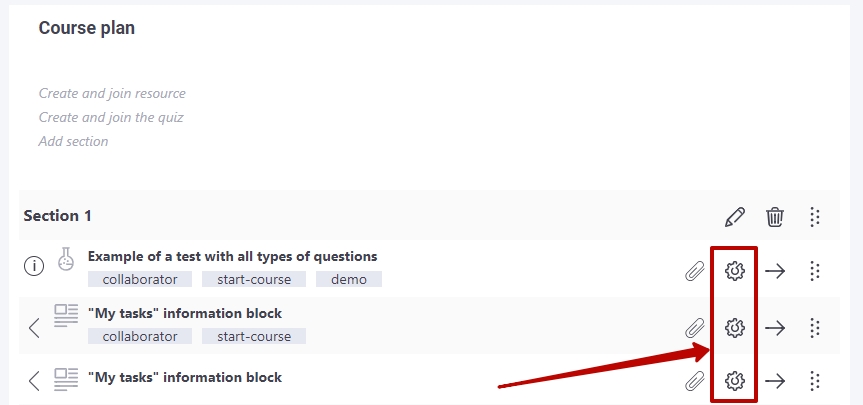
(9) - passage settings for the resource/quiz/workshop
(10) - buttons to move elements in the course plan (Up, Down, Add to section)
(11) - Add section - adding sections to the Course Plan;
(12) - Buttons for operating the section - title editing, deleting, moving;
(13) - Create and join the quiz - button to go to the creation of a new quiz. The quiz will automatically be added to the Course Plan;
(14) - Create and join resource - button for switching to create a new resource. The resource will automatically be added to the Course Plan;
(15) - Create Task - button for switching to the creation of a new task with this course;
(16) - Back - button for switching to the course table;
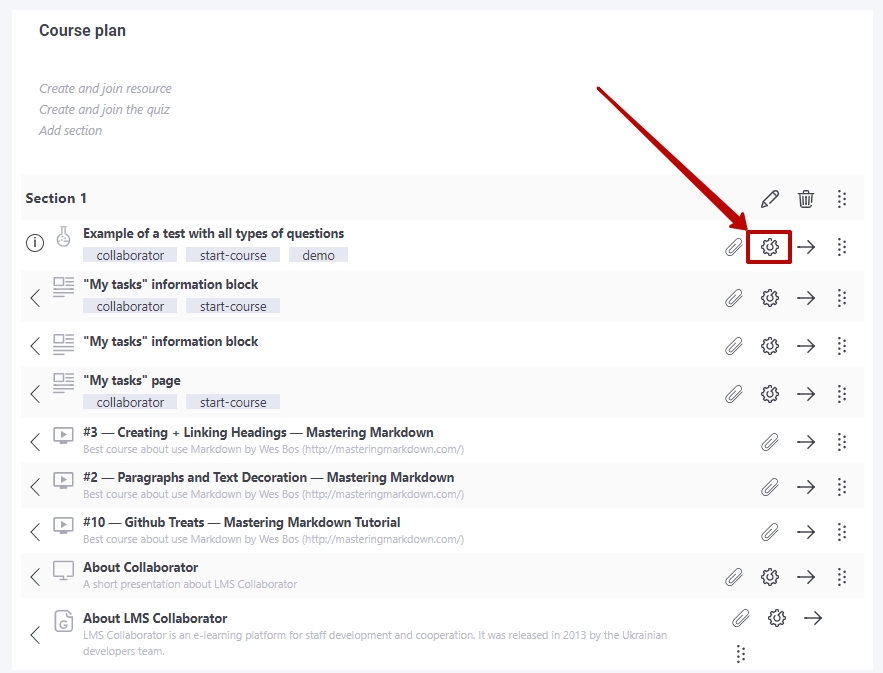
Test parameter settings
For each type of resource in the course, there are parameters that can be configured by clicking on the button on the task parameters page:
You can set the following parameters for the quiz:
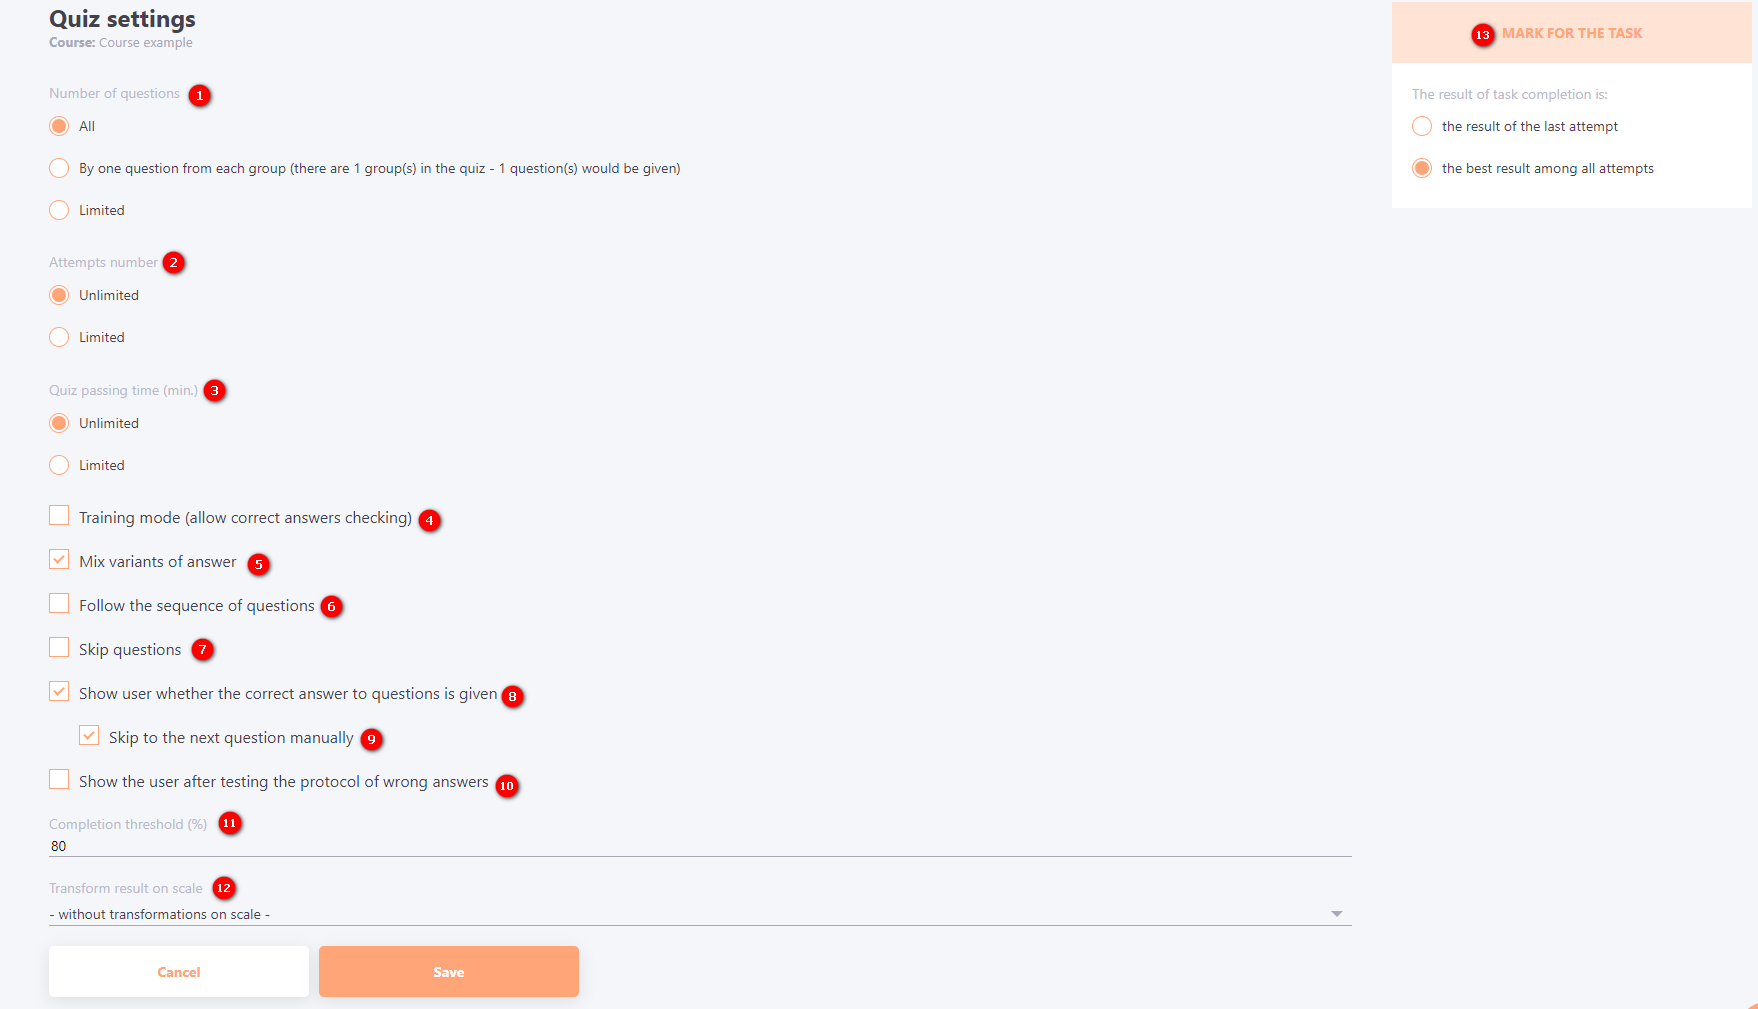
(1) - Number of questions – determines how many questions will be given to the user in the quiz out of the whole array of quiz questions. By default all questions will be displayed. The specified number of questions will be displayed in random order.
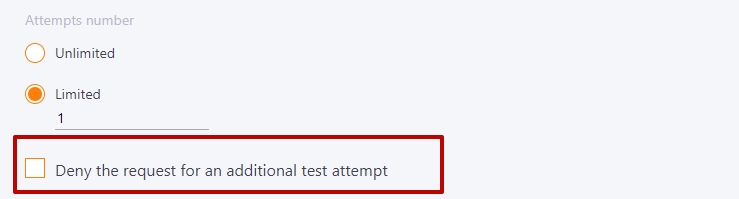
(2) - Attempts number – by default, the number of test attempts is not limited. Limits can be set. In this case, the user can ask the administrator for an additional attempt to pass (find more in Requests for quizzing attempts ). It is possible to strictly limit the number of attempts - the option Deny the request for an additional test attempt.
(3) - Quiz passing time (min.) – allows you to limit the time in minutes for testing. After this time has elapsed, the test will be completed and the user will be awarded points.
(4) - Training mode (allow correct answers checking)" – if it is enabled, allows the user to check the correctness of the selected answer choice. In the case of choosing the wrong answer - change the choice. Used for practice testing, not for checking knowledge.
(5) - Mix variants of answer - is enabled by default, all answer choices in the quiz questions will be displayed in random order.
(6) - Follow the sequence of questions - the questions will be displayed to the user in the order that you specified when you created the quiz (will not be mixed) (find more in Setting the order of questions in quizzes);
(7) - Skip questions" - users will be given buttons to skip questions in the quiz. After skipping a question, the user will have to answer it at the end of the quiz.
(9) - Skip to the next question manually - the setting is available when selecting the option Show user whether the correct answer to questions is given (8) - to go to the next test question, the user must click the "Next question" button.
(10) - Show the user after testing the protocol of wrong answers - at the end of the test, the user will be shown a list of questions with answer options for which the user answered incorrectly (for more details, see Viewing Quizzes results by the User after passing the test);
(11) - Completion threshold – determines how many points you need to score on the quiz to be considered successful.
(12) - Transform result on scale - if you use scales to assess tasks, you can connect the scale to the test. In this case the result in the report will be recalculated and displayed according to the scale. (find more in Mark scales )
(13) - Mark for the task - the default setting is the best score among all attempts. You can only set the result of the last attempt if this is the quiz for which the final grade is given.
Resource parameter settings
For each type of resource in the course, there are parameters that you can customize by clicking the button on the task parameters page:
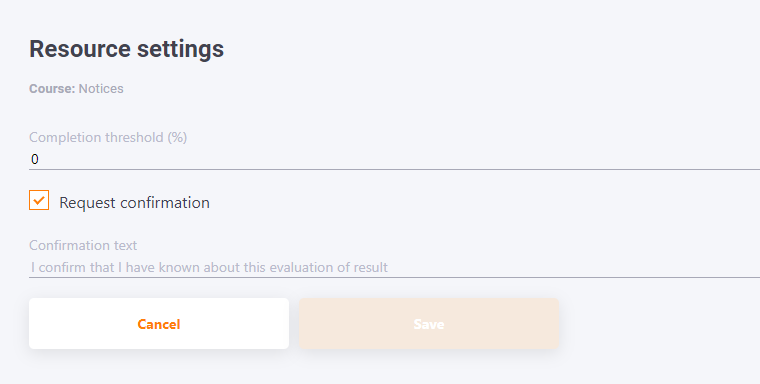
You can set a Completion threshold for resources. If the percentage of learning the resource is equal to or greater than the specified completion threshold, the resource is considered successfully completed.
Request confirmation option.
If this option is on, after viewing the resource, the user must select the checkbox to confirm the reading. Information about the fact of confirmation is displayed in the report. As long as the user does not confirm the reading, the resource status will remain "in progress". To enable the option it is necessary to enter the confirmation text:
Workshop parameter settings
For each type of resource in the course, there are parameters that you can configure by clicking the button on the assignment parameters page.
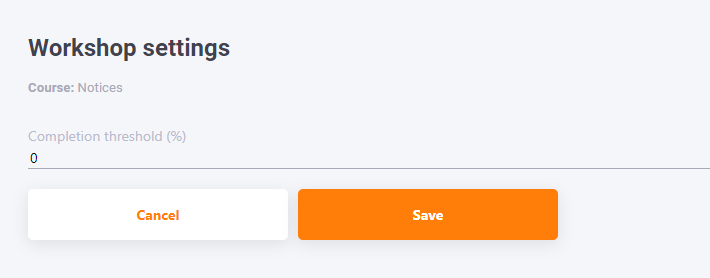
For workshops you can set Completion threshold. If the grade for the workshop is equal to or greater than the specified completion threshold, the resource automatically becomes successfully completed.
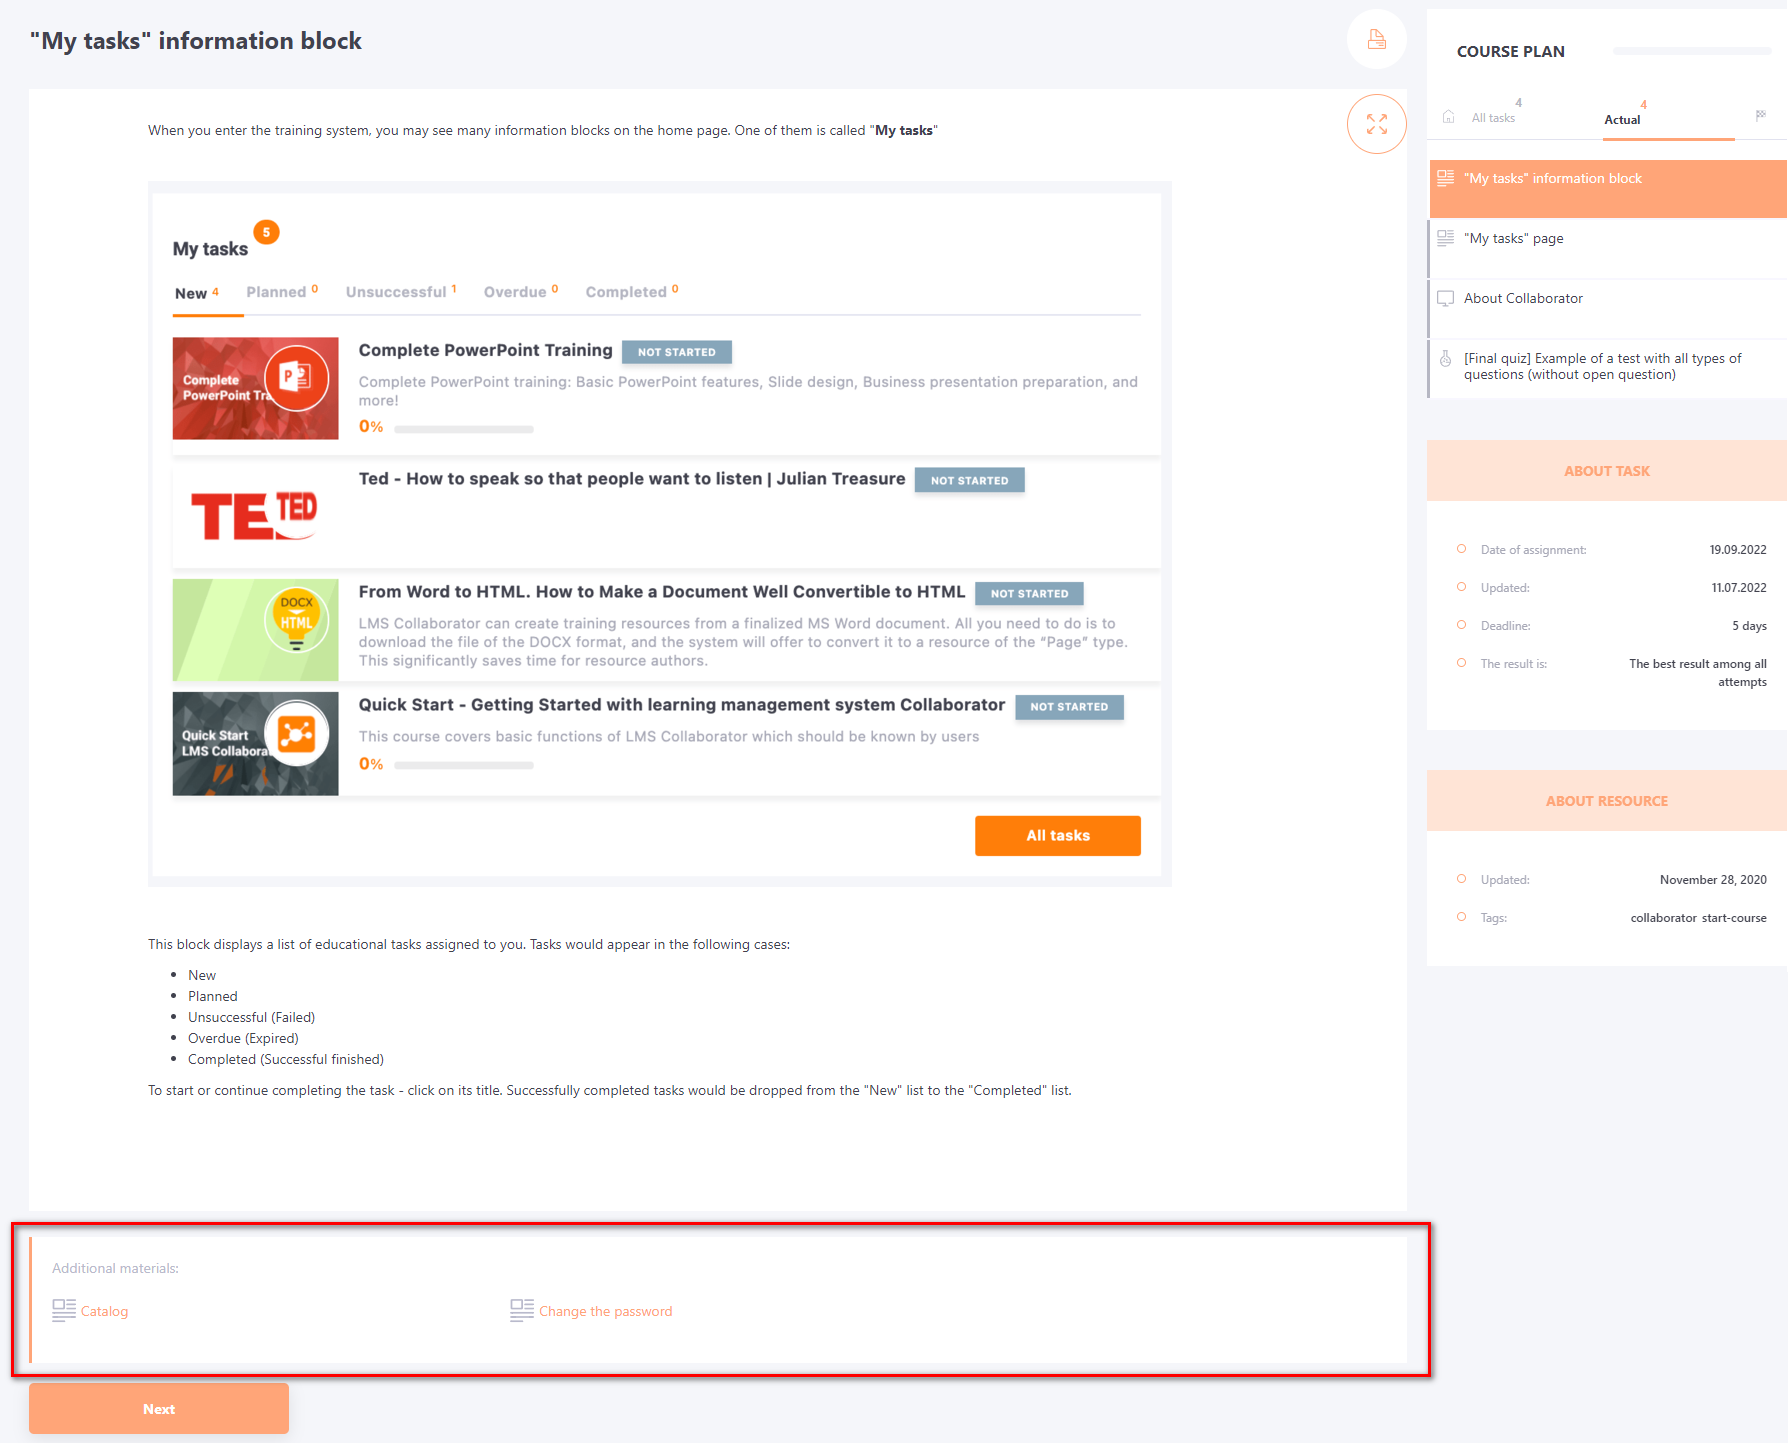
Additional materials
Additional materials can be attached to the resources in the Course Plan.
 - button for switching to Additional Materials.
(1) - Type field for selecting the type of resource from the list
(2) - the Search field to search for resources by title;
(3) - searching for resources by Tags;
(4) - a list of 10 random resources;
Add (5) button moves the learning resources to the right list under Additional Materials;
Remove (6) button removes learning resources from Additional Materials;
(7) - list of additional materials;
(8) - buttons for moving resources up and down;
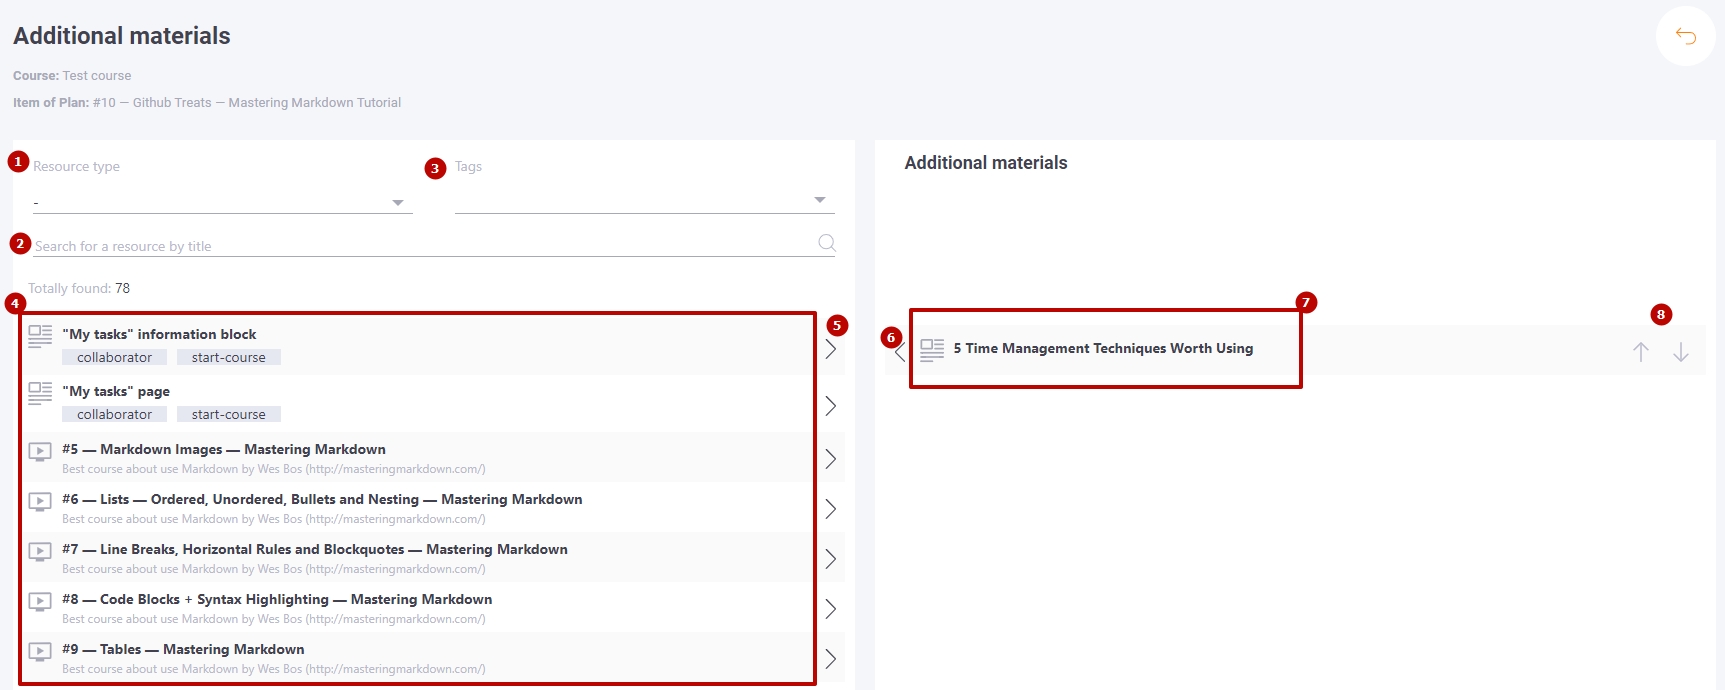
A list of additional materials is displayed below the main resource. This is very convenient for users who take courses from the smartphone and do not always review the content of the plan.
Review of the Course Plan with Additional Materials:
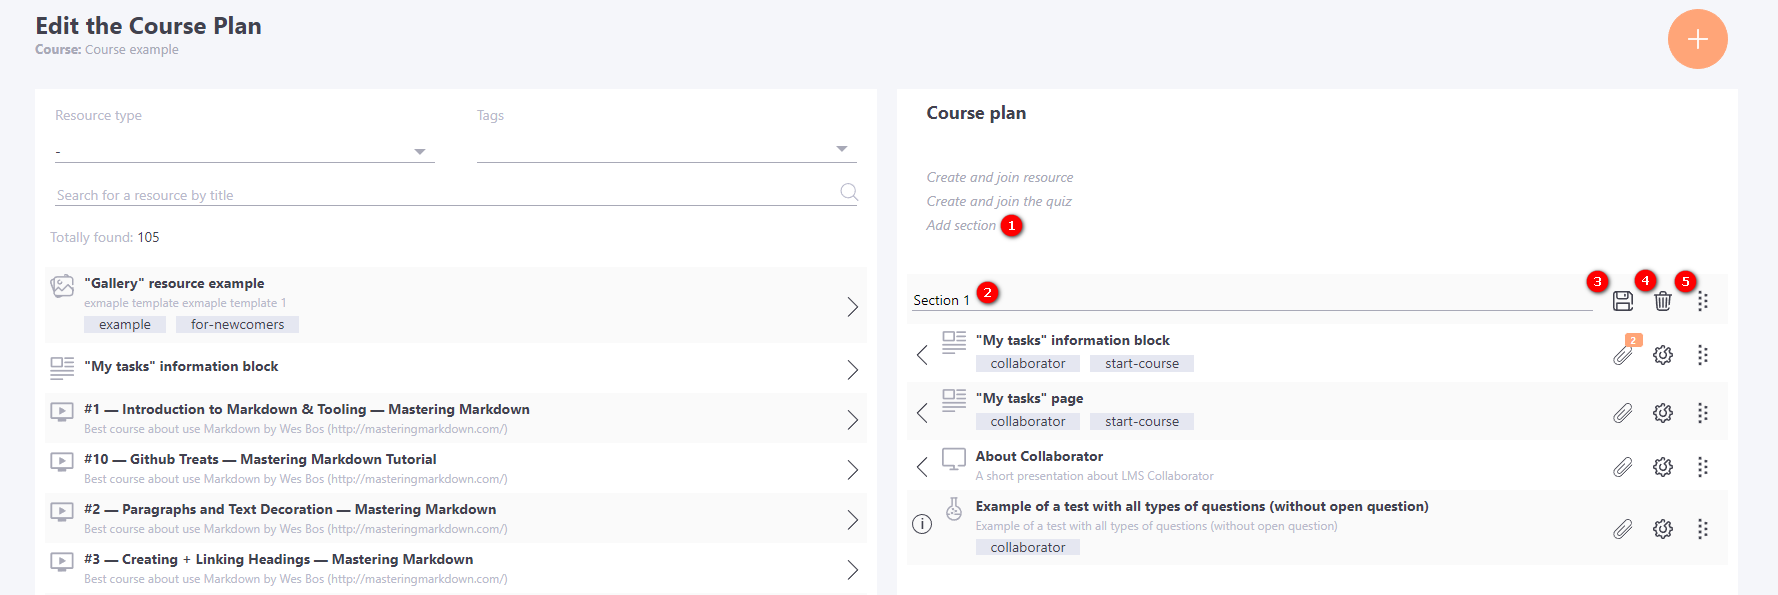
Creating a Course Plan with Sections
In the Course Plan, you can divide resources, tests, and quizzes into meaningful blocks by using dividers. The dividers, or sections, are the headings of the blocks in the Course Plan.
The Add Section (1) button is used to add a new section to the course plan. The new unit appears at the beginning of the course plan being created. To set a name for the section, you need to change the text in the (2) field. The (3) button saves the changes to the section name and opens the section for editing. To delete a unit, use the Delete button (4). The (5) button is used to move the unit in the course plan list
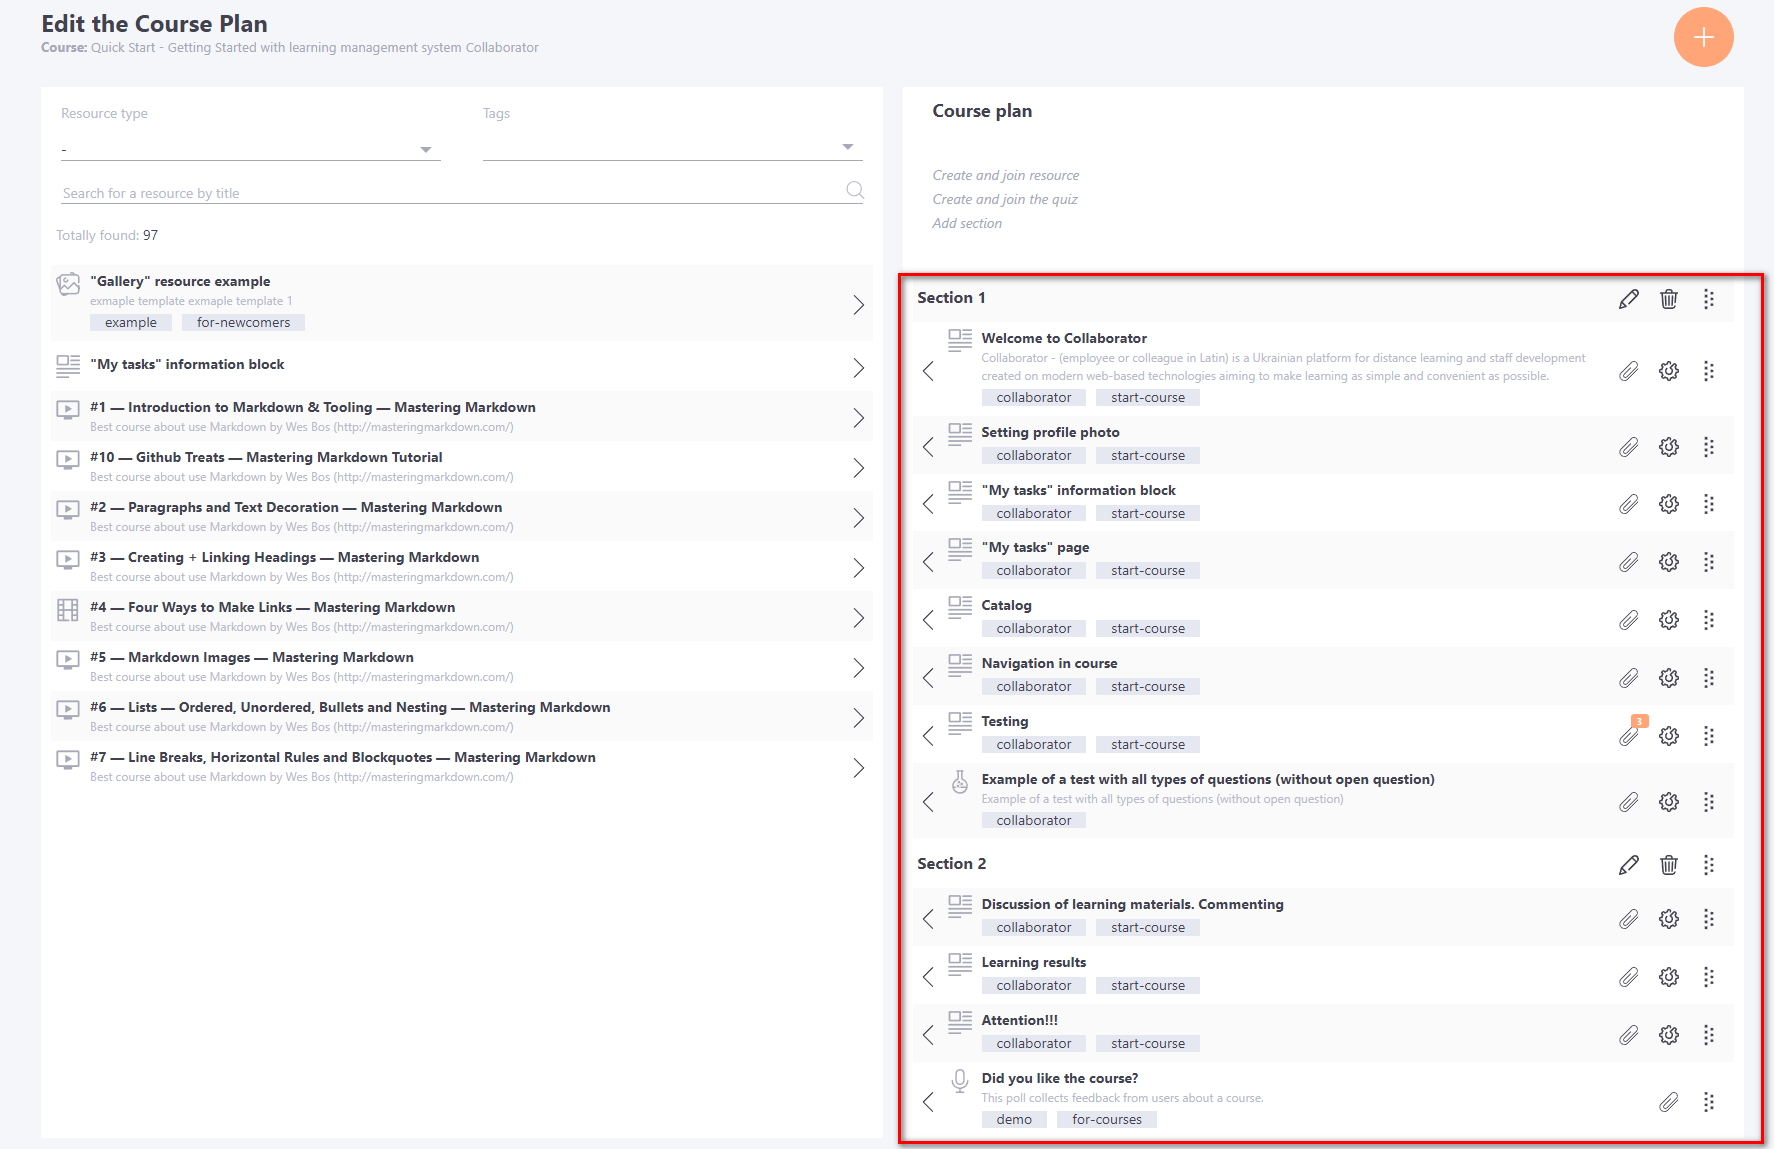
An example of a compiled Course Plan with sections in Edit mode
The same course in the task