Working with the structure tree
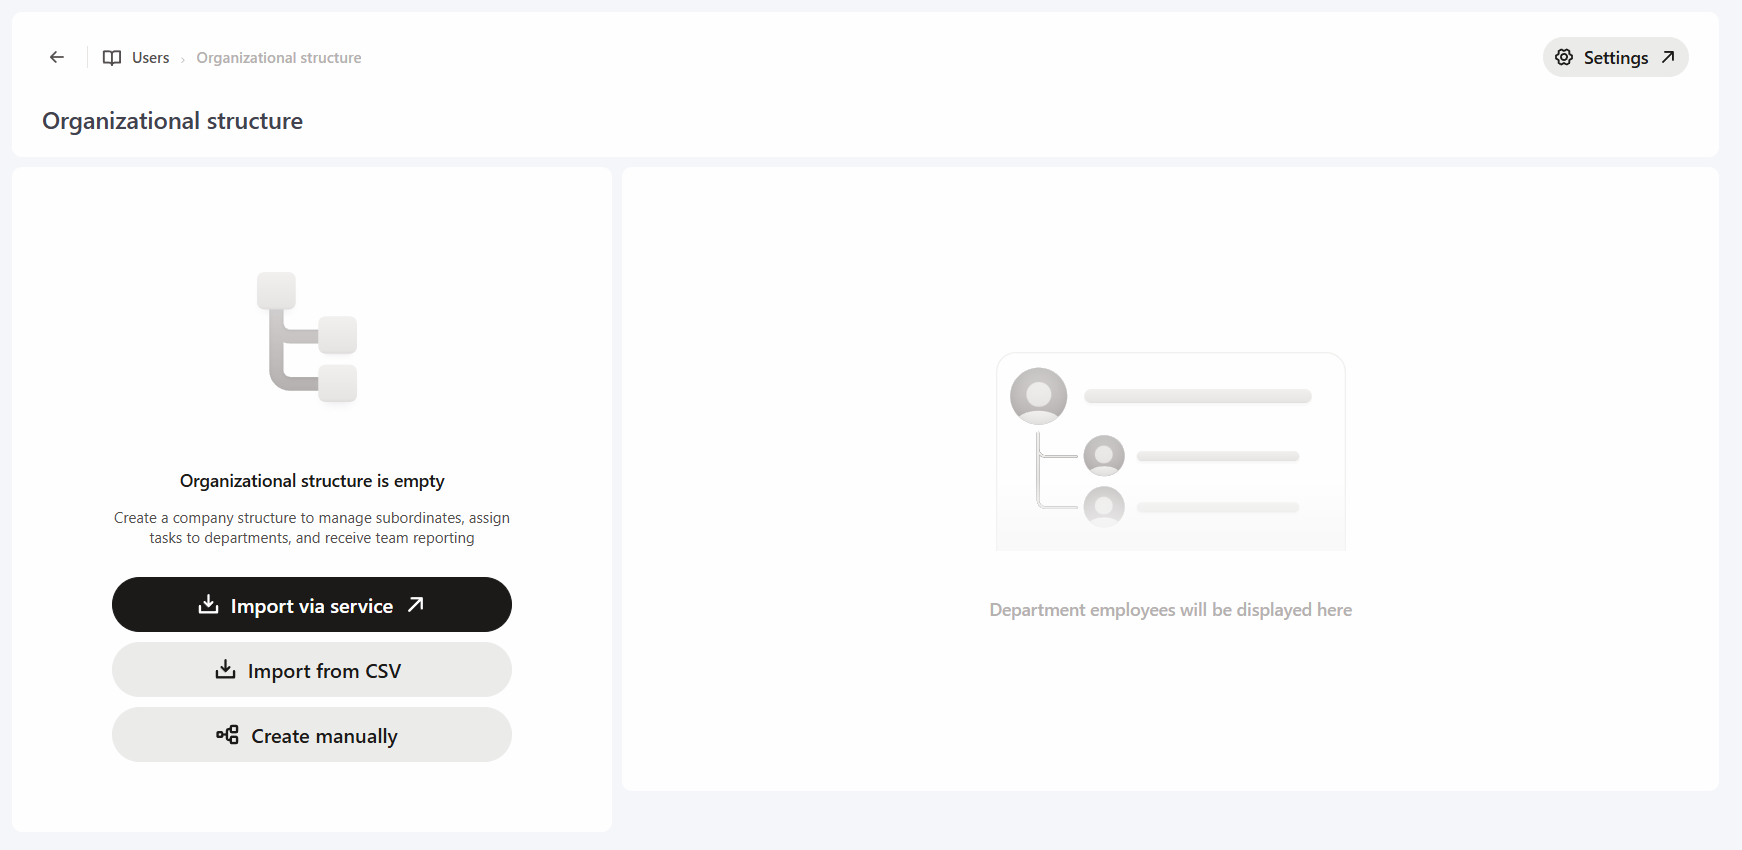
At the beginning of working with the system the "Organizational Structure" functionality is empty, so you need to create an organizational structure tree - add folders corresponding to the departments and their hierarchy.
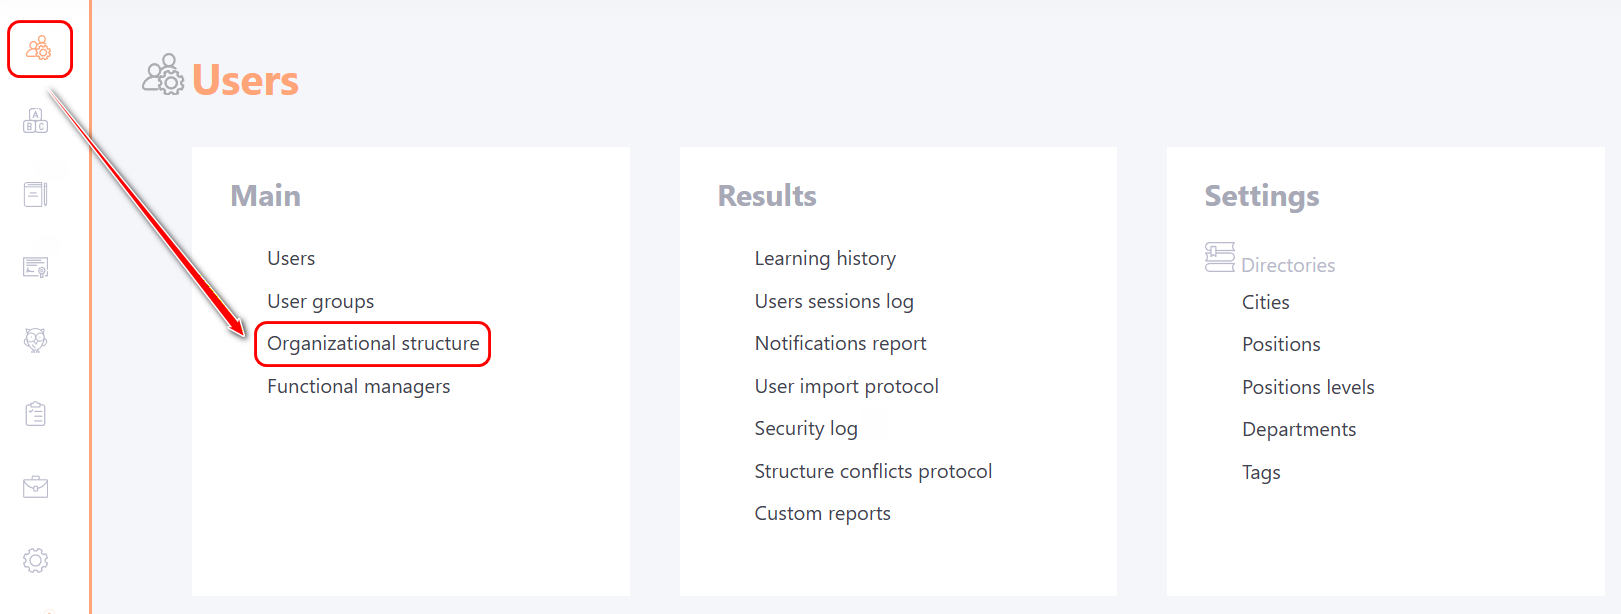
To create an Organizational Structure, go to the Users - Organizational Structure menu:
You can create organizational structure folders in the following ways:
- Create manually — add department and unit folders, forming the necessary structure.
- Import via service — the ability to download a ready-made organizational structure using the appropriate service. More details: Importing structure from Azure AD, Importing structure from Active Directory.
- Import from CSV — prepare an organizational structure tree in CSV-file format and download it. More details: Import with CSV file.
Import using a CSV-file is possible if Mode - By import value or Mode - Hybrid (both modes) is selected in Orgstructure policy.
Configuring the Organizational structure tree
To add a new department of a higher level of the hierarchy to the organizational structure, you need to click the "Add department"(1) button at the top of the page.
To add a subordinate (nested) department to an existing one, you need to click the Actions button opposite the management department and select Add department or click on the department title and in the field on the right click the Add department (2) button .
In this way, you can create the required number of departments and form a multi-level hierarchy in accordance with the company's organizational structure.
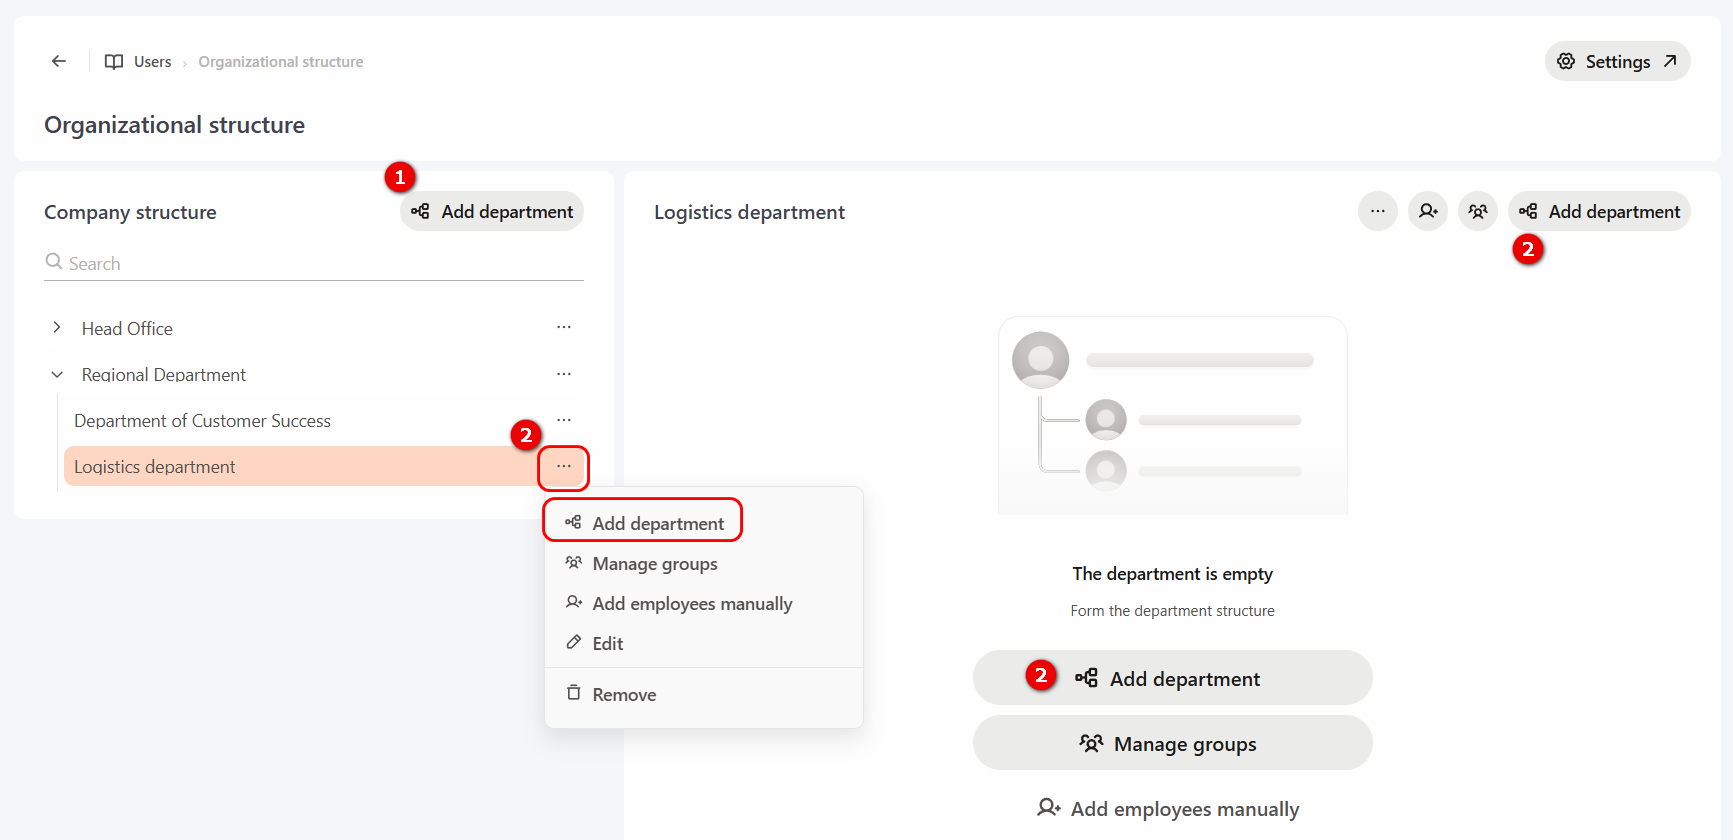
Also, when you click the Actions button for each folder the following options are available:
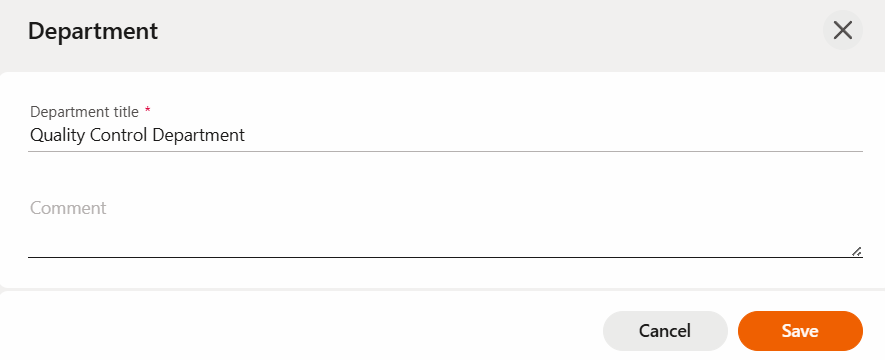
- Add department - create a new subordinate department. When you click this button, a modal window will open in which you need specify the Department title, add a comment if necessary, and click the Save button.
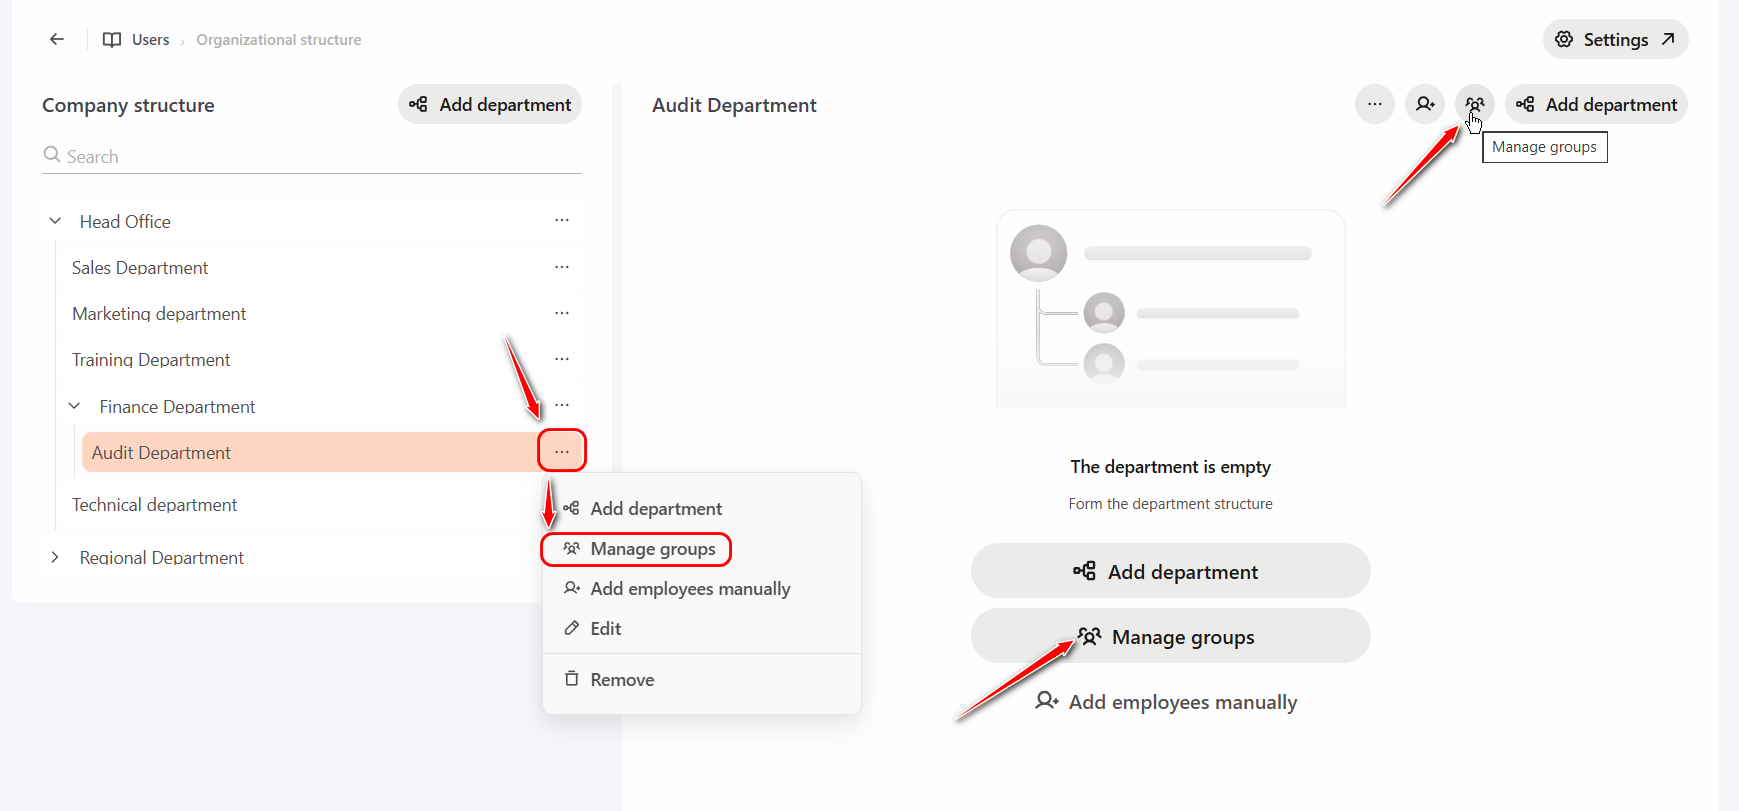
- Manage groups - the option determines which User groups belong to this department.
- Add employees manually - the ability to manually add a user to the department regardless of the configured rules.
- Edit - the ability to change the title of the department, as well as add a comment if necessary.
- Remove- removes the department from the organizational structure.
Moving departments
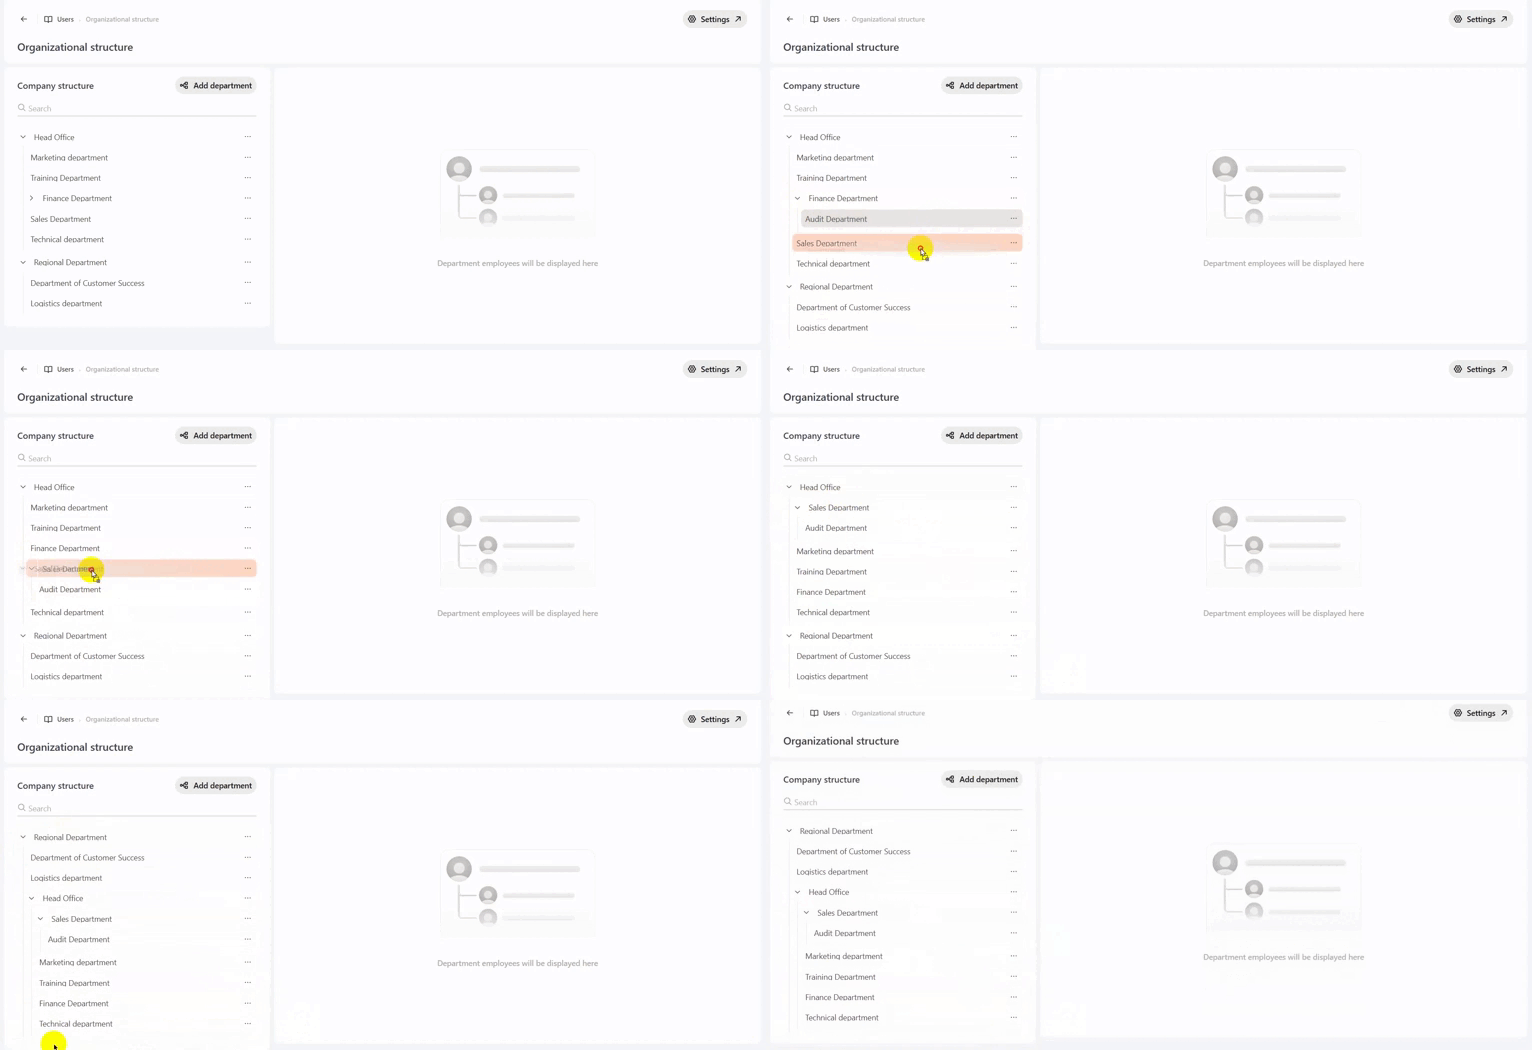
Any department can be moved to another department using drag and drop.
To move a department, hover over the desired folder, press and hold the left mouse button, and then drag the folder to the desired location.
Adding employees to the Organizational Structure
Depending on the settings selected in the Orgstructure policy, there are three user addition modes for adding users to the organizational structure:
- By user groups;
- By import value;
- Hybrid (both modes).
User addition mode "By user groups"
In the "By user groups" mode, employees are added to organizational structure folders based on User groups.
First, you need to create User Groups and configure rules by which the system automatically determines which users should belong to each Group.
To add employees to a department-folder, click the Actions button opposite this department-folder and select Manage groups. Or, click on the department title and in the viewing area on the right, click the Manage groups button.
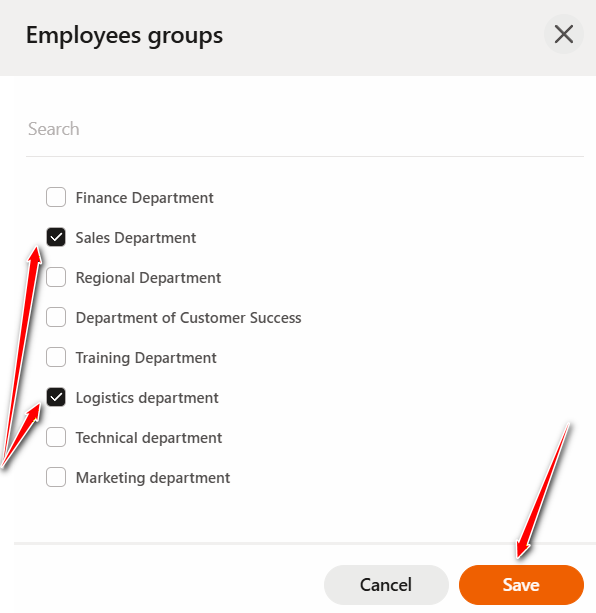
In the modal window that opens, you need to check the boxes for which User Groups belong to this department and click the Save button.
You can select multiple User Groups for one organizational structure folder.
After saving the settings, the system automatically adds users who belong to the selected Groups to the department . In the future, the department's composition is automatically updated according to changes in the composition of the Groups.
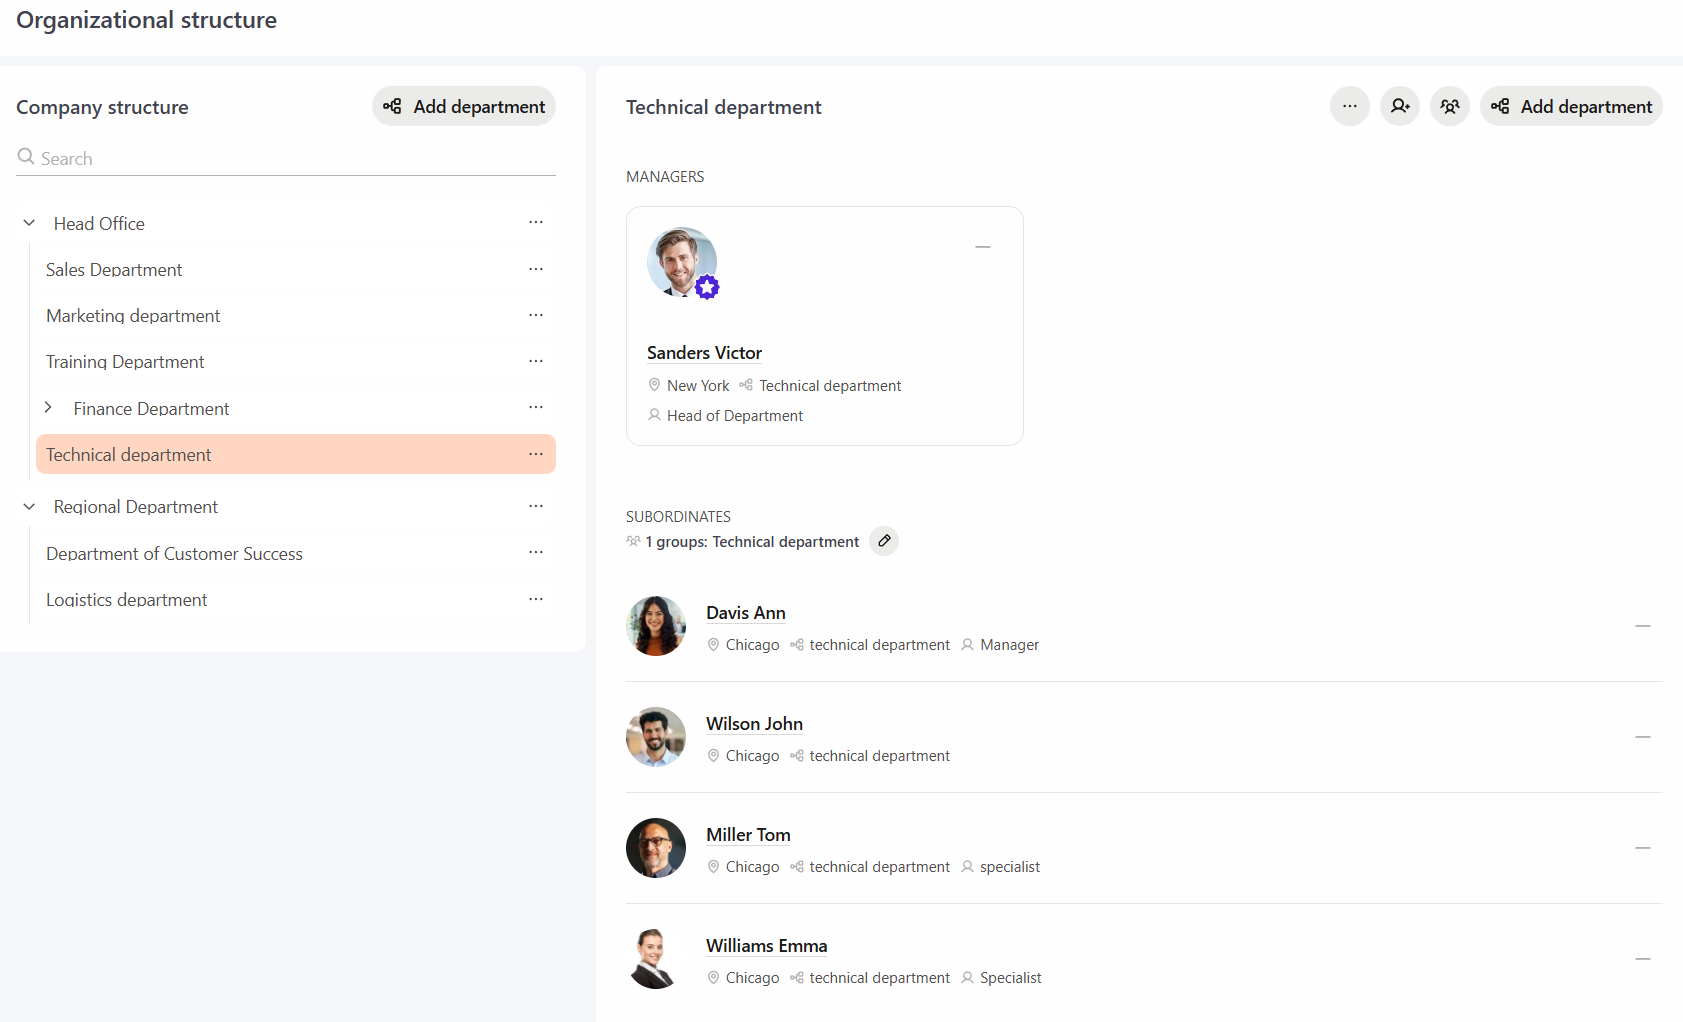
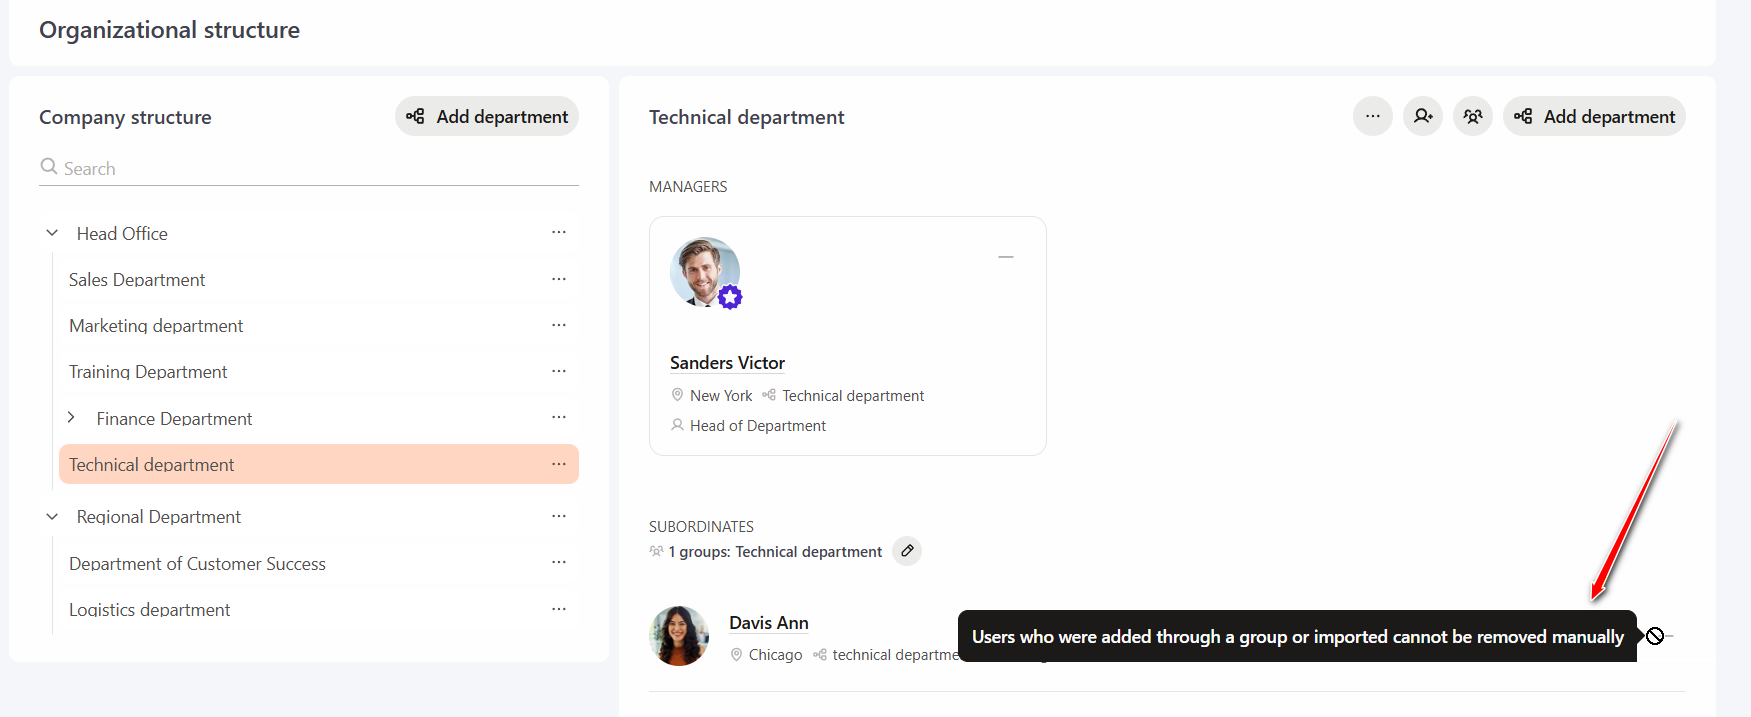
Adding users to folders manually
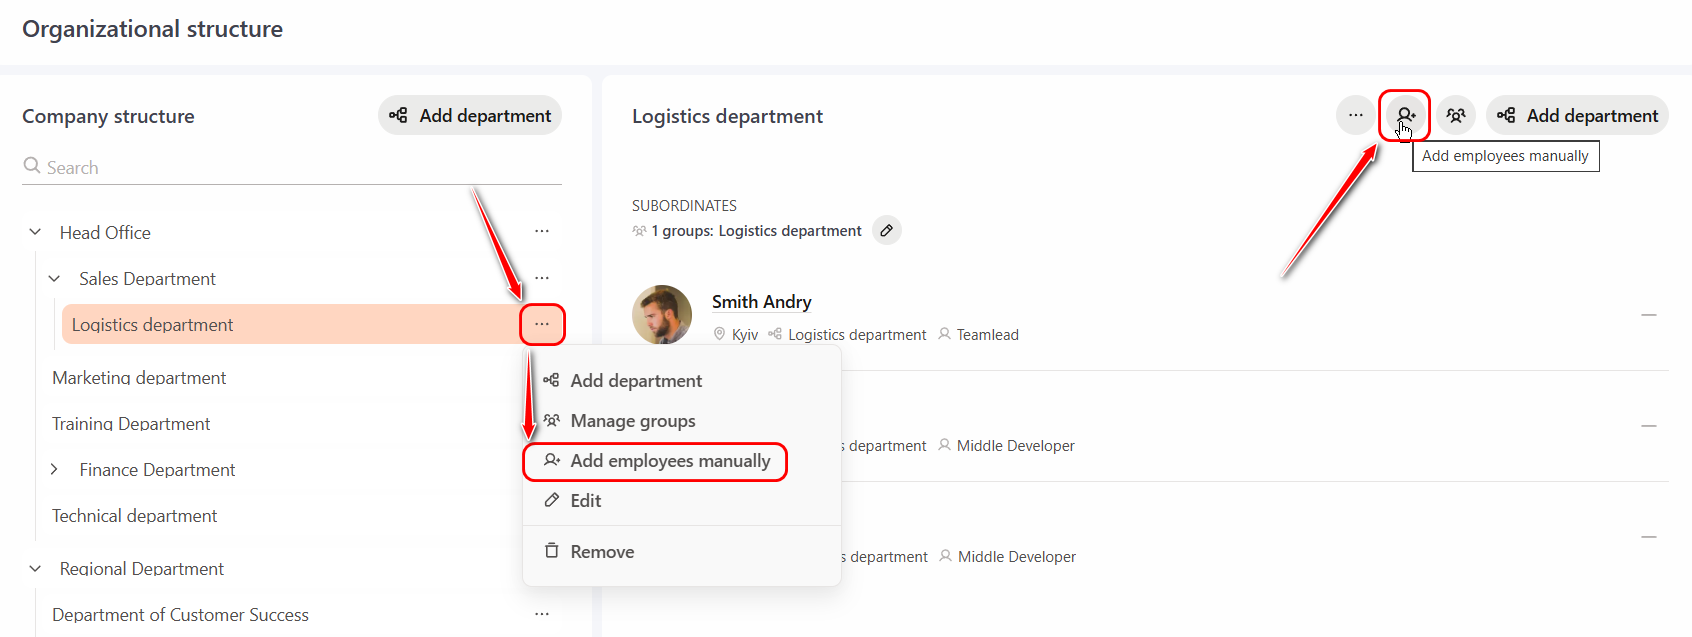
To add manually a user to the organizational structure folder, click the Actions button next to this department and select Add employees manually. Or click the department title and in the view area on the right, click the Add employees manually button.
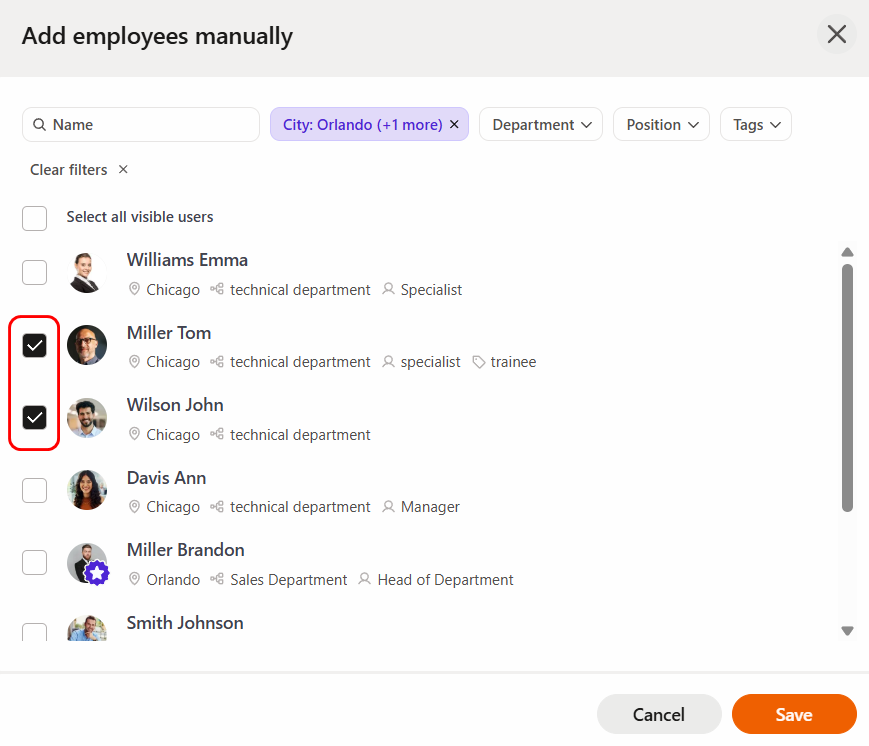
In the modal window that opens, you need to check the checkboxes of the required users and click the Save button. If necessary, you can use the search by full name and filtering by attributes: city, department, position, tags.
Users who are added manually have a corresponding Manually marker in the folder view. You can also easily remove such users from the folder.
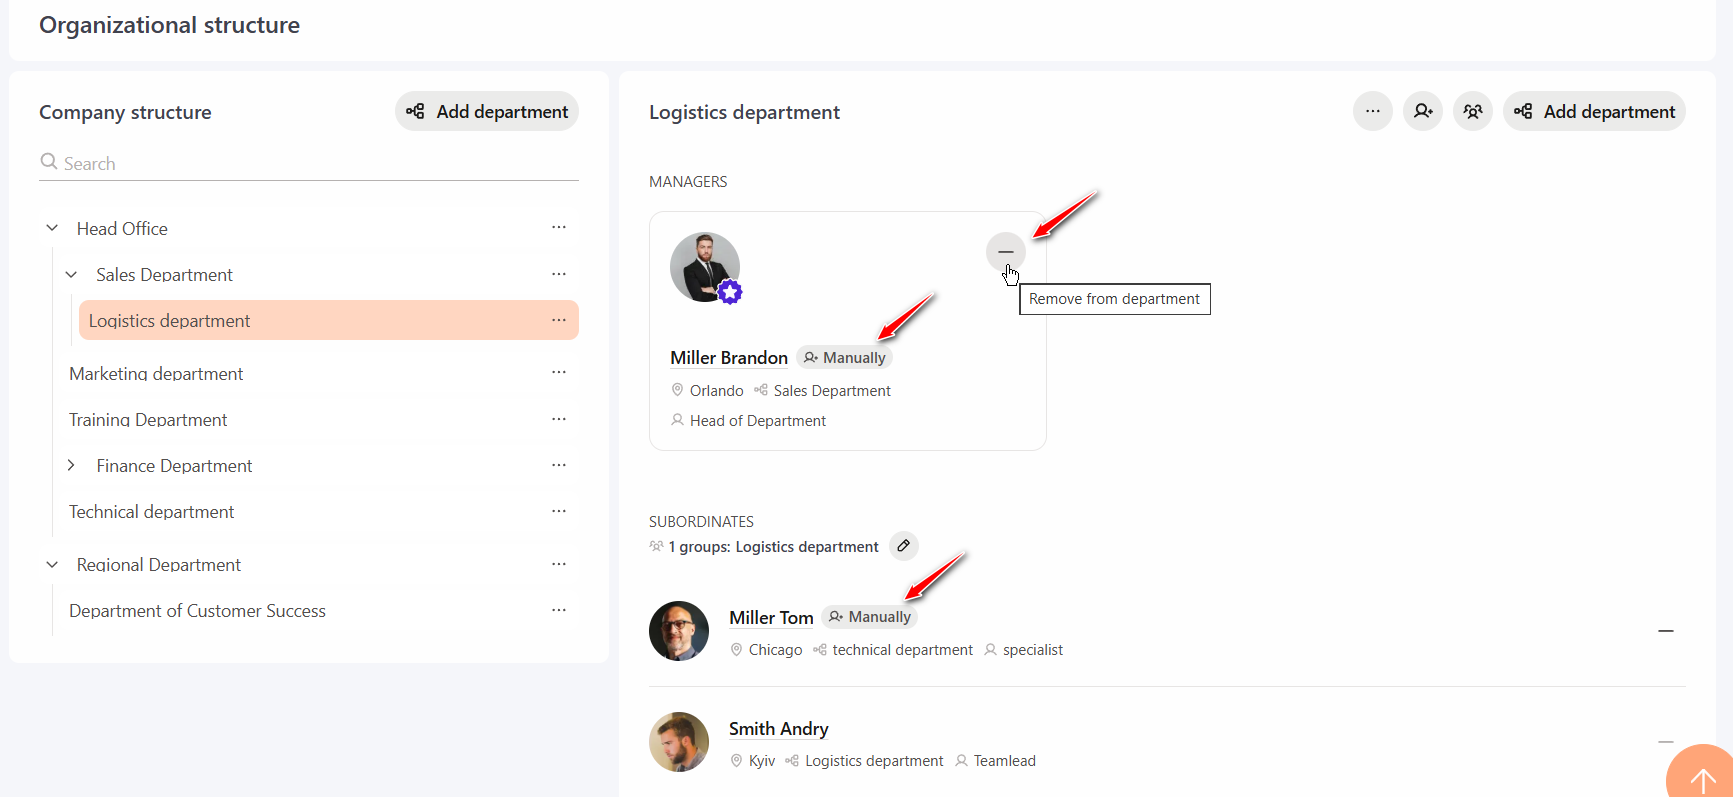
- if a user is added to the organizational structure folder manually, and later a User Group to which this user also belongs is added to the folder settings, it will be displayed only once and will have the "Manually" marker;
- if the user's attribute values have changed and it no longer corresponds to the configured User Group, but it remains manually added, it will continue to be displayed in the organizational structure folder;
- if a manually added user is removed and it no longer corresponds to the configured User Group, it will be removed from the organizational structure folder.
User addition mode "By import value"
If the "By import value" mode is selected in the Orgstructure policy, you can upload both the organizational structure tree and users with the corresponding departments to the system.
Importing the organizational structure tree
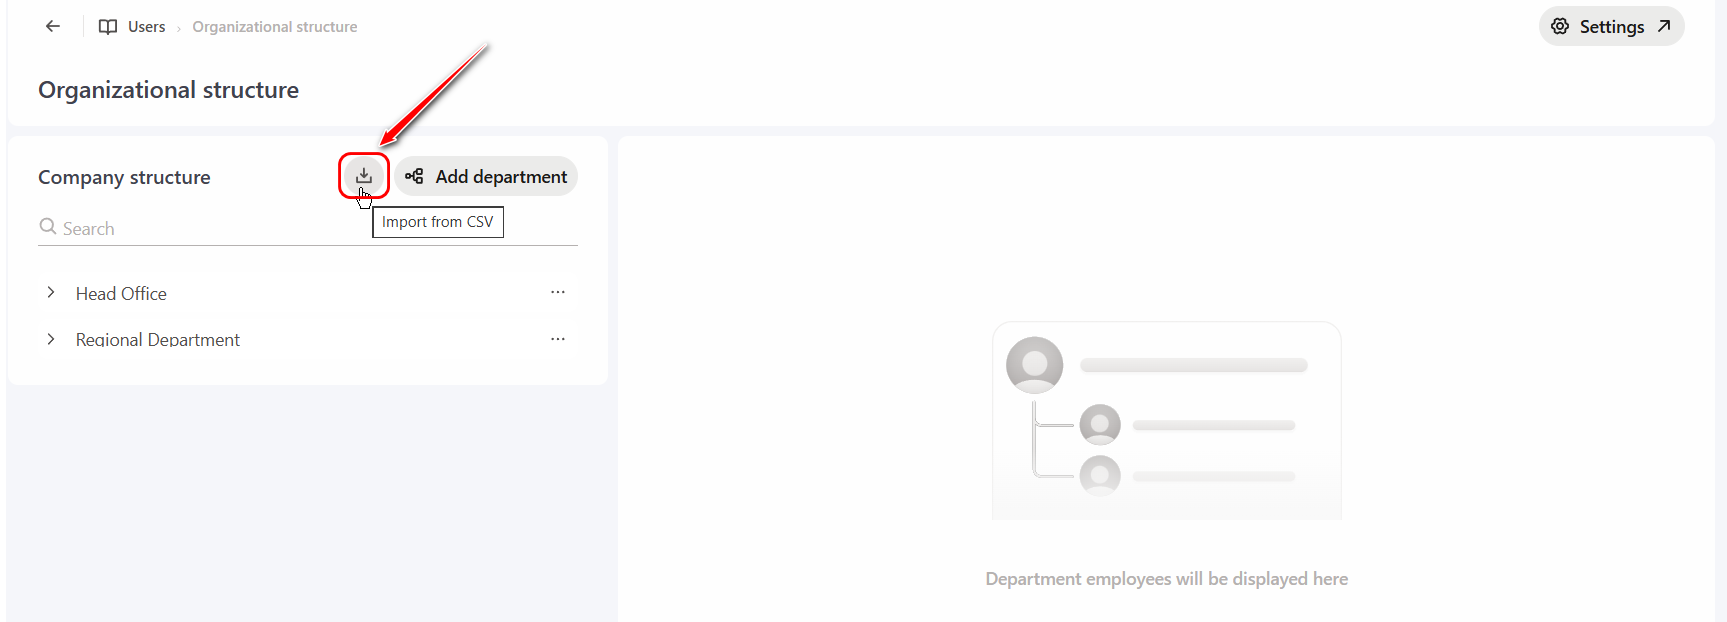
To upload all folders (trees) of the organizational structure at once, you must first create a csv-file (more details: Import with CSV file), in which for each folder you need specify:
- department code;
- department title;
- parent department code.
After that, on the Organizational Structure creation page, you need click the Import from CSV button and select the appropriate csv-file.
Distribution of users by departments
After successfully importing the organizational structure folders, it is necessary to add information with the code of the departments to which the user should be distributed to the csv-file for importing users (for more details: Synchronization users using CSV).
User addition mode "Hybrid (both modes)"
If Hybrid mode is selected in the Orgstructure policy, the system simultaneously takes into account User Group settings and Import value when distributing users to organizational structure folders. This mode also allows manual addition of users to organizational structure folders.
Hybrid mode is especially convenient if you need to save organizational structure settings formed by User Groups during subsequent automatic data import.
- If the user does not have the
structure_uidattribute, then the distribution is done according to the configured User Groups. - If the
structure_uidattribute is set, then the distribution will be done according to this attribute (there can be one or more folders, depending on the Allow user assignment to multiple organizational departments option). In this case, the distribution according to the User Groups rules will no longer work.
In other words, the priority when distributing a user to folders will be the structure_uid attribute. If it is not specified, the settings of the organizational structure folders according to User Groups will be used.
Adding a user to multiple departments at the same time
Quite often, an employee can work in several related positions at once, but in different departments. By enabling the Orgstructure policy setting Mode: "By import value" or "Hybrid", the user assignment to multiple organizational departments becomes available:
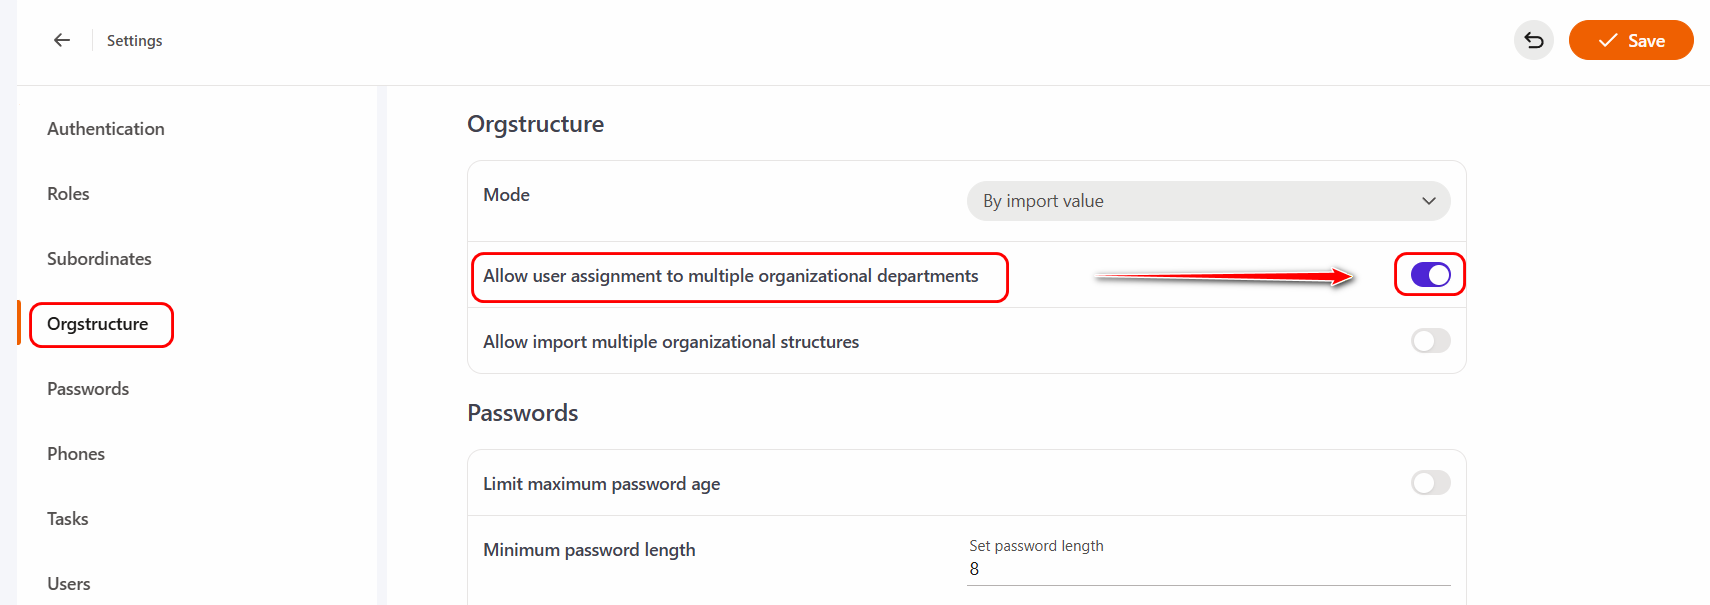
You can set a user a multiple departments only in "By import value" or "Hybrid" mode, as otherwise the system will have a conflict in user distribution and position definition based on the attributes.
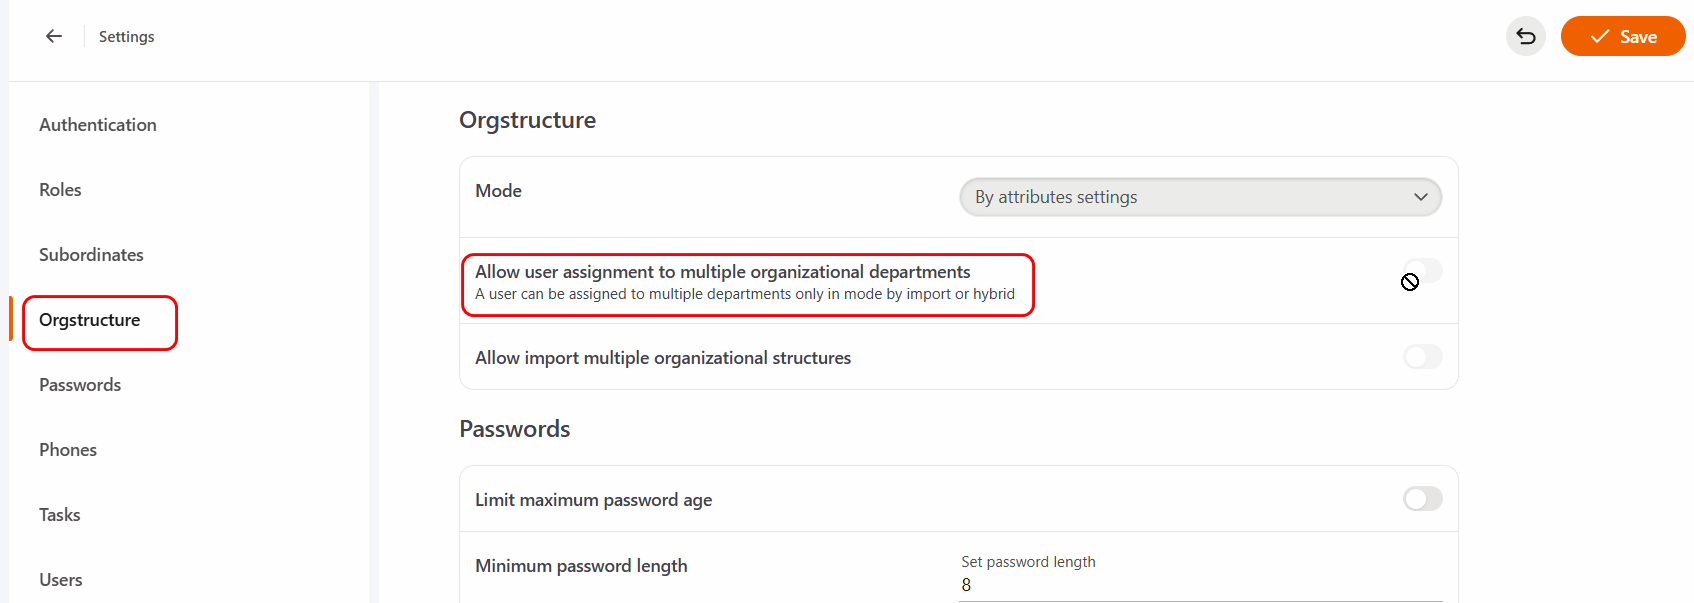
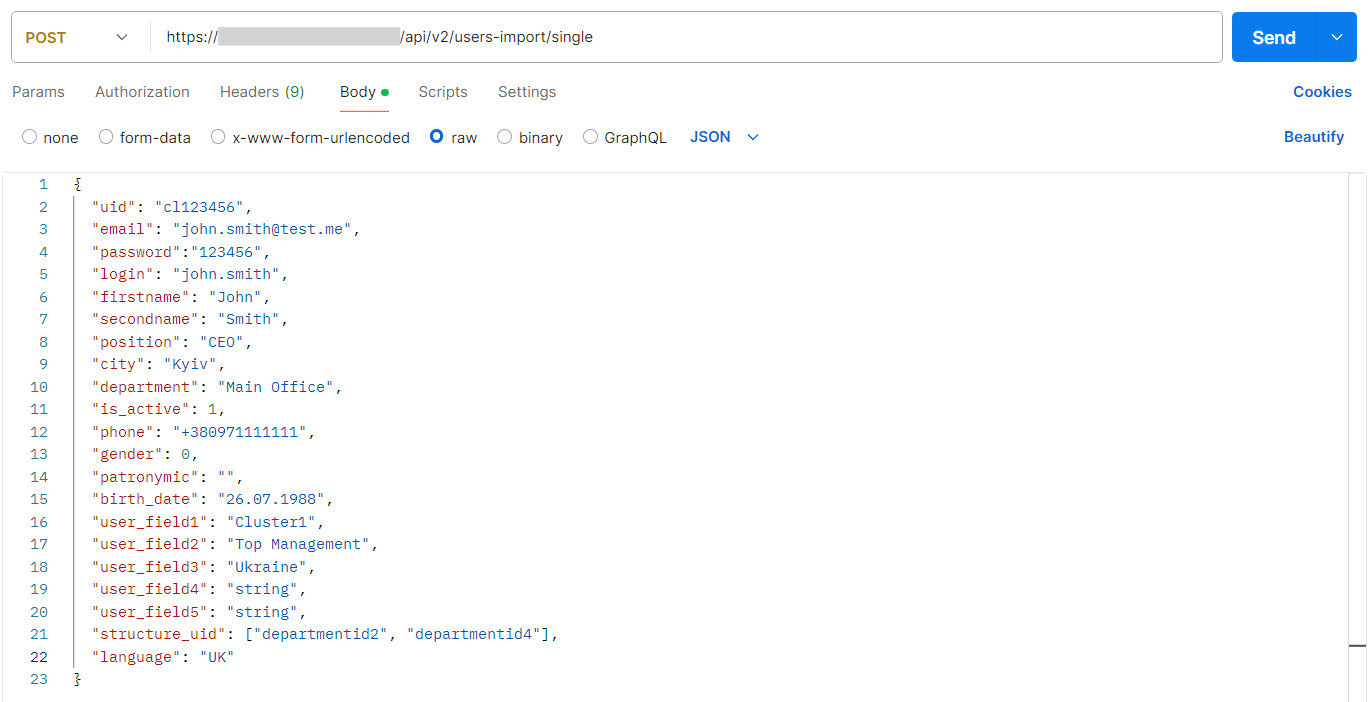
With this setting, when importing users the structure_uid field can contain more than one department code. For CSV format it is comma separated values, for API it is an array.
Example of transferring multiple departments in CSV-file (the 20th field in the order, Department code):
ID;Last name;First name;Middle name;Login;Email;Password;Birthdate;Gender (F-1, M-0);City;Department;Position;Tags;Phone;Status(0 - working, 1 - dismissed, 2 - maternity leave, 3 - sick leave);Employment date;Google Id;Work contacts;Date of current position assignment;Department code;Additional field 1;Additional field  2;Additional field  3;JSON;Interface language (EN, UK, DE, ES, ET, TR, RU);Additional field  4;Additional field  5;role_id;Manager Uid;position_level
demo1;Johnson;Catherine; ;demo1;[email protected];123456;16.10.88;1;New York;Sales Department;Sales manager;sales;671234567;;21.02.15;;Working phone number.:222, Email: [email protected];20.03.16;departmentId1;;;;;;;;;;
demo2;Miller;Brandon;;demo2;[email protected];123456;31.03.91;0;New York;Marketing Department;Head of Department; ;971234567;;02.04.14;;;;departmentId1,departmentId2;;;;;;;;;;
demo3;Smith;Johnson; ;demo3;[email protected];123456;19.03.82;0;New York;Main Office;HR;;631234567;1;12.05.13;;;;departmentId2,departmentId3,departmentId4;;;;;;;;;;
demo4;Williams;Olivia; ;demo4;[email protected];123456;30.05.72;1;Kyiv;Sales;Seller;trainee;981234567;;02.04.14;;;;departmentId1,departmentId3;;;;;;;;;;
Example of transferring multiple departments using API: