Quiz creating. Quiz parameters
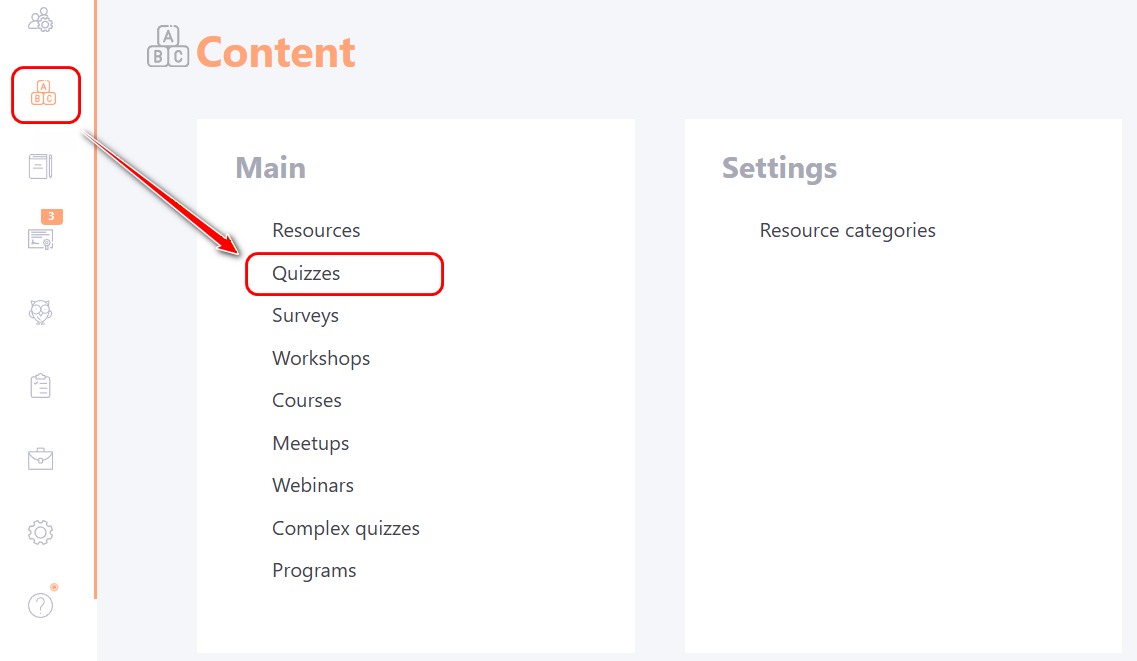
All created tests in the system, as well as the ability to create new ones, are presented in the Content Menu - Quizzes :
Working with the Quiz Table
The Quizzes page displays a list of all created quizzes in a table with the following columns:
(1) - Title - the name of the quiz;
(2) - Questions – the number of questions in the quiz;
(3) - Author – the full name of the user who is the author of the quiz;
(4) - Tags – tags can be added for more convenient searching if necessary. You can select a tag from the existing list in the dropdown or via search, or create a new one. For more details: Tag management
(5) - Date of change - the date of the last changes to the quiz;
(6) - Published – once created, a quiz must be published. Only published quizzes can be used in courses, programs, and assignments.
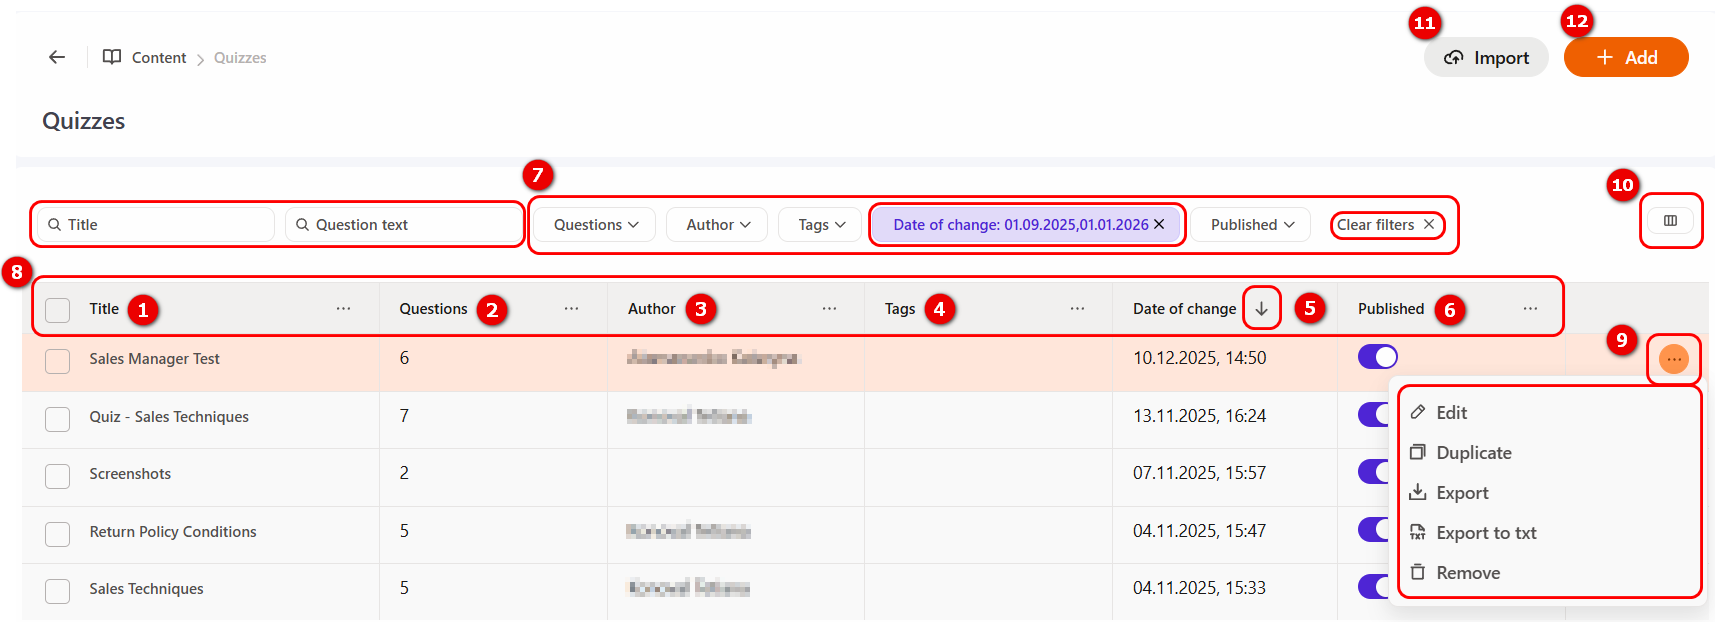
You can Search for a specific quiz by its Name or Question Text. To search by Question Text, enter the text of the question or its keywords into the search bar; the system will display a list of all quizzes containing that question. This is useful if you need to delete or edit a specific question across all quizzes where it is located.
Filtering (7) is available for the remaining columns. You can apply filters to multiple columns simultaneously. When any filter is applied, a "Clear Filters" button will appear. If multiple filters are active, a cancel button will appear next to each parameter to remove individual filters. To reset all filters at once, click the "Clear Filters" button.
Sorting (8) is available for any column in the table, but it can only be applied to one parameter at a time. By default, quizzes are sorted by the Date of change.
(9) – Actions Button – the following actions are available for each quiz:
- Edit – modify the quiz description and questions;
- Duplicate – create a copy of the quiz along with all its questions;
- Export – export the quiz with its settings for future import back into the system;
- Export to .txt – save the quiz to your PC in .txt format;
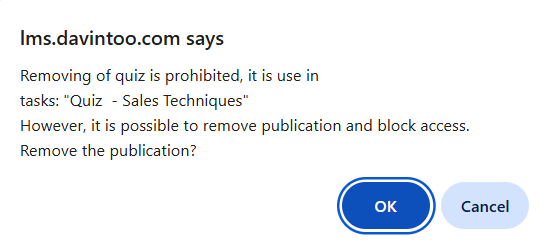
- Remove – delete the quiz along with its questions. After clicking "Remove", a confirmation window will appear. If the quiz is currently used in courses, programs, or assignments, it cannot be deleted. In this case, the system will suggest unpublishing it instead of deletion.
Using the "Hidden columns (10)" button, you can configure the display of columns with the required information. If the toggle is enabled (blue), the corresponding column is displayed in the table; if disabled — the column is hidden. The number of hidden columns is indicated directly on the button.

Additionally, a column can be hidden by clicking the More button next to its name and selecting the "Hide column" action from the dropdown menu. Also, via the More button, sorting and navigation to filtering are available.
Example of hiding the "Date of change" column.
(11) - Import - import of a ready-made quiz;
(12) - Add - creating a new quiz;
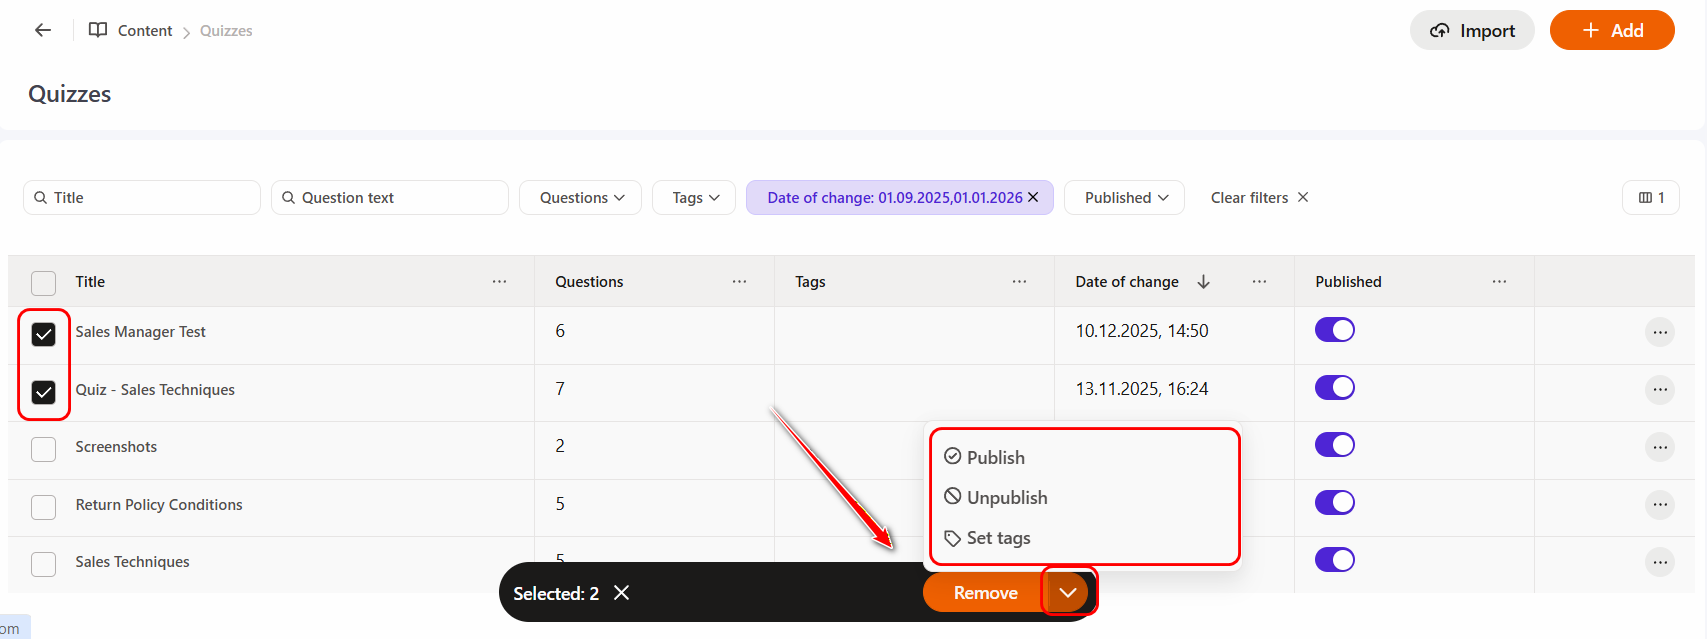
For convenient work with quizzes, the possibility of group actions is provided. For this, it is necessary to mark the required quizzes using checkboxes - after which a panel with available actions will appear at the bottom of the screen. By default, the «Remove» button is available, and by clicking on the arrow next to it, you can select additional options: Publish, Unpublish or Set tags.
If you uncheck the checkboxes from the quizzes, the action panel will automatically disappear.
Creating a quiz
To create a new test, click the Add button in the upper-right corner of the page. After that, the test creation page will open.
On the Creating a quiz page, the following fields for completion and options are available:
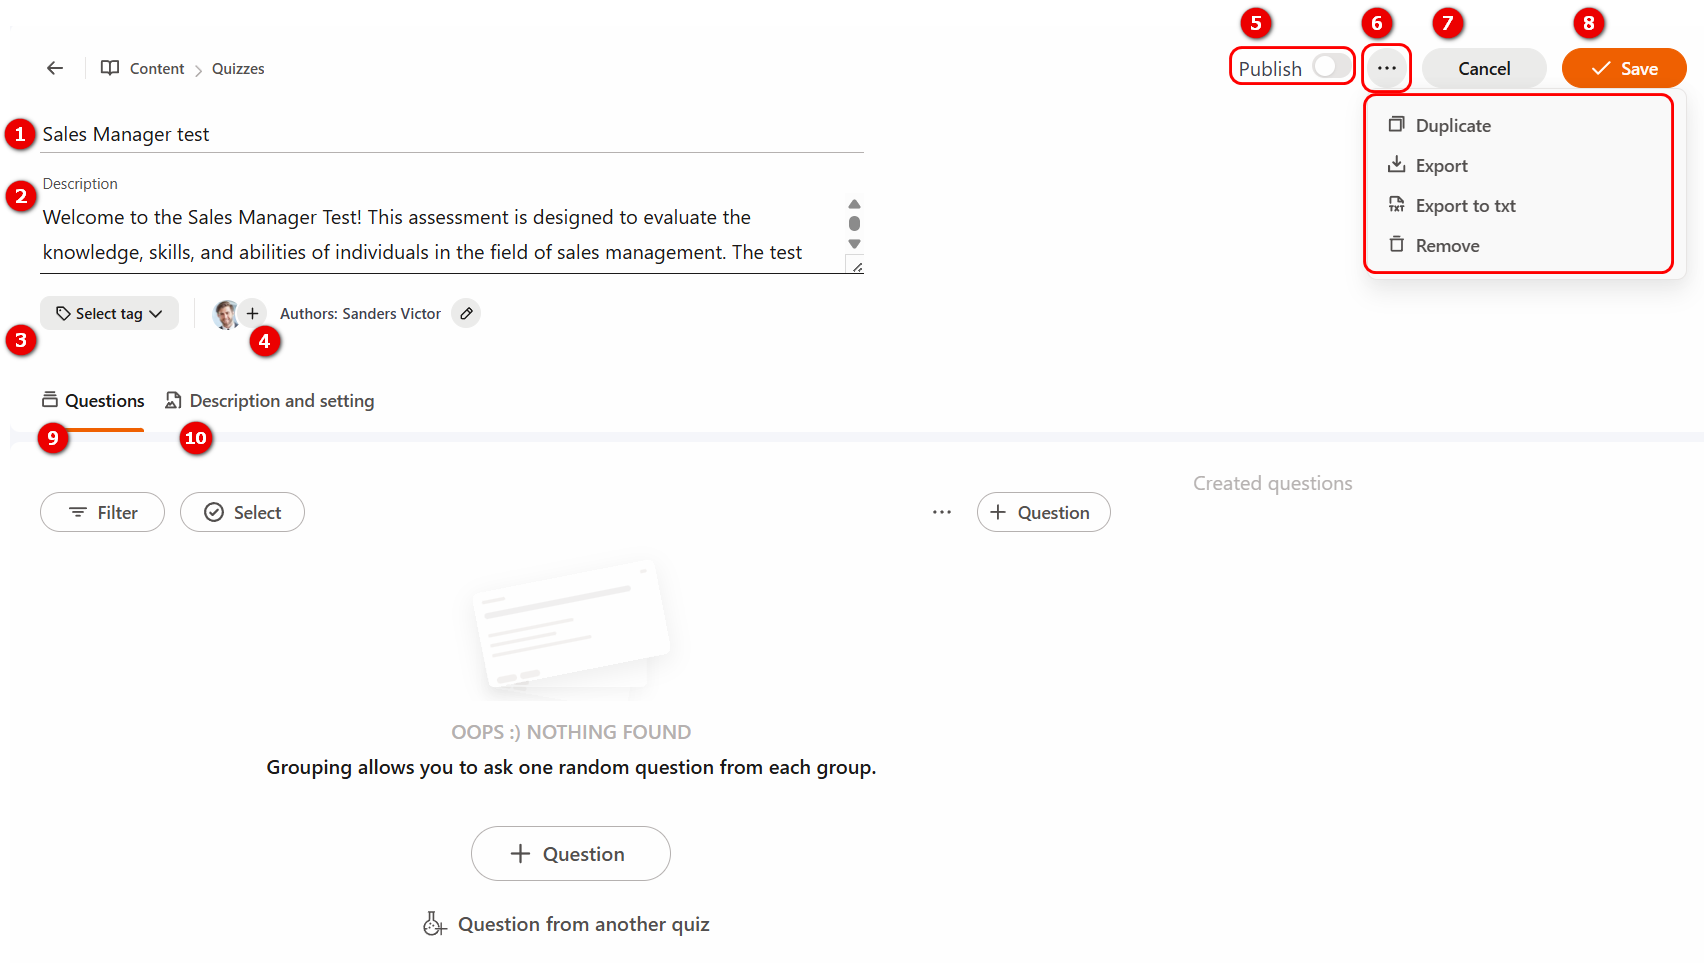
(1) - Title - mandatory field for a short quiz name;
(2) - Description - a short description displayed in the quiz table. In the description, you can use emojis and the line break tag <br>;
(3) - Select tag - adding tags if necessary;
(4) - Author - full name of the user who created the quiz. The field is filled automatically, but the author can be changed or co-authors can be added. More details: Authors and co-authors for quizzes.
(5) - Publish - by default, publication is disabled. Only published quizzes can be used to create an assignment.
(6) - Actions Button - the following actions are provided for the quiz:
- Duplicate - duplicating the quiz along with all questions;
- Export- export of the quiz taking into account the settings, which can later be imported into the system;
- Export to txt - saving the quiz on a PC in txt format;
- Remove – delete the quiz along with its questions.
(7) - Cancel - cancels changes that have not yet been saved. After clicking the "Save" button, it is not possible to cancel changes using this button.
(8) - Save quiz.
(9) - Questions tab - creation and editing of quiz questions are available on this tab.
(10) - Description and settings tab - designed for preparing the information that the user will see before starting the quiz. Here you can:
- formulate a detailed description of the quiz: add completion conditions, evaluation criteria, maximum number of points, etc.;
- format the text using images, links, or tables;
- upload a cover (image) for the assignment card.
By default, the quiz creation page opens on the Questions tab.
Description and settings of quizzes
On the Description and Settings tab, the following information is displayed:
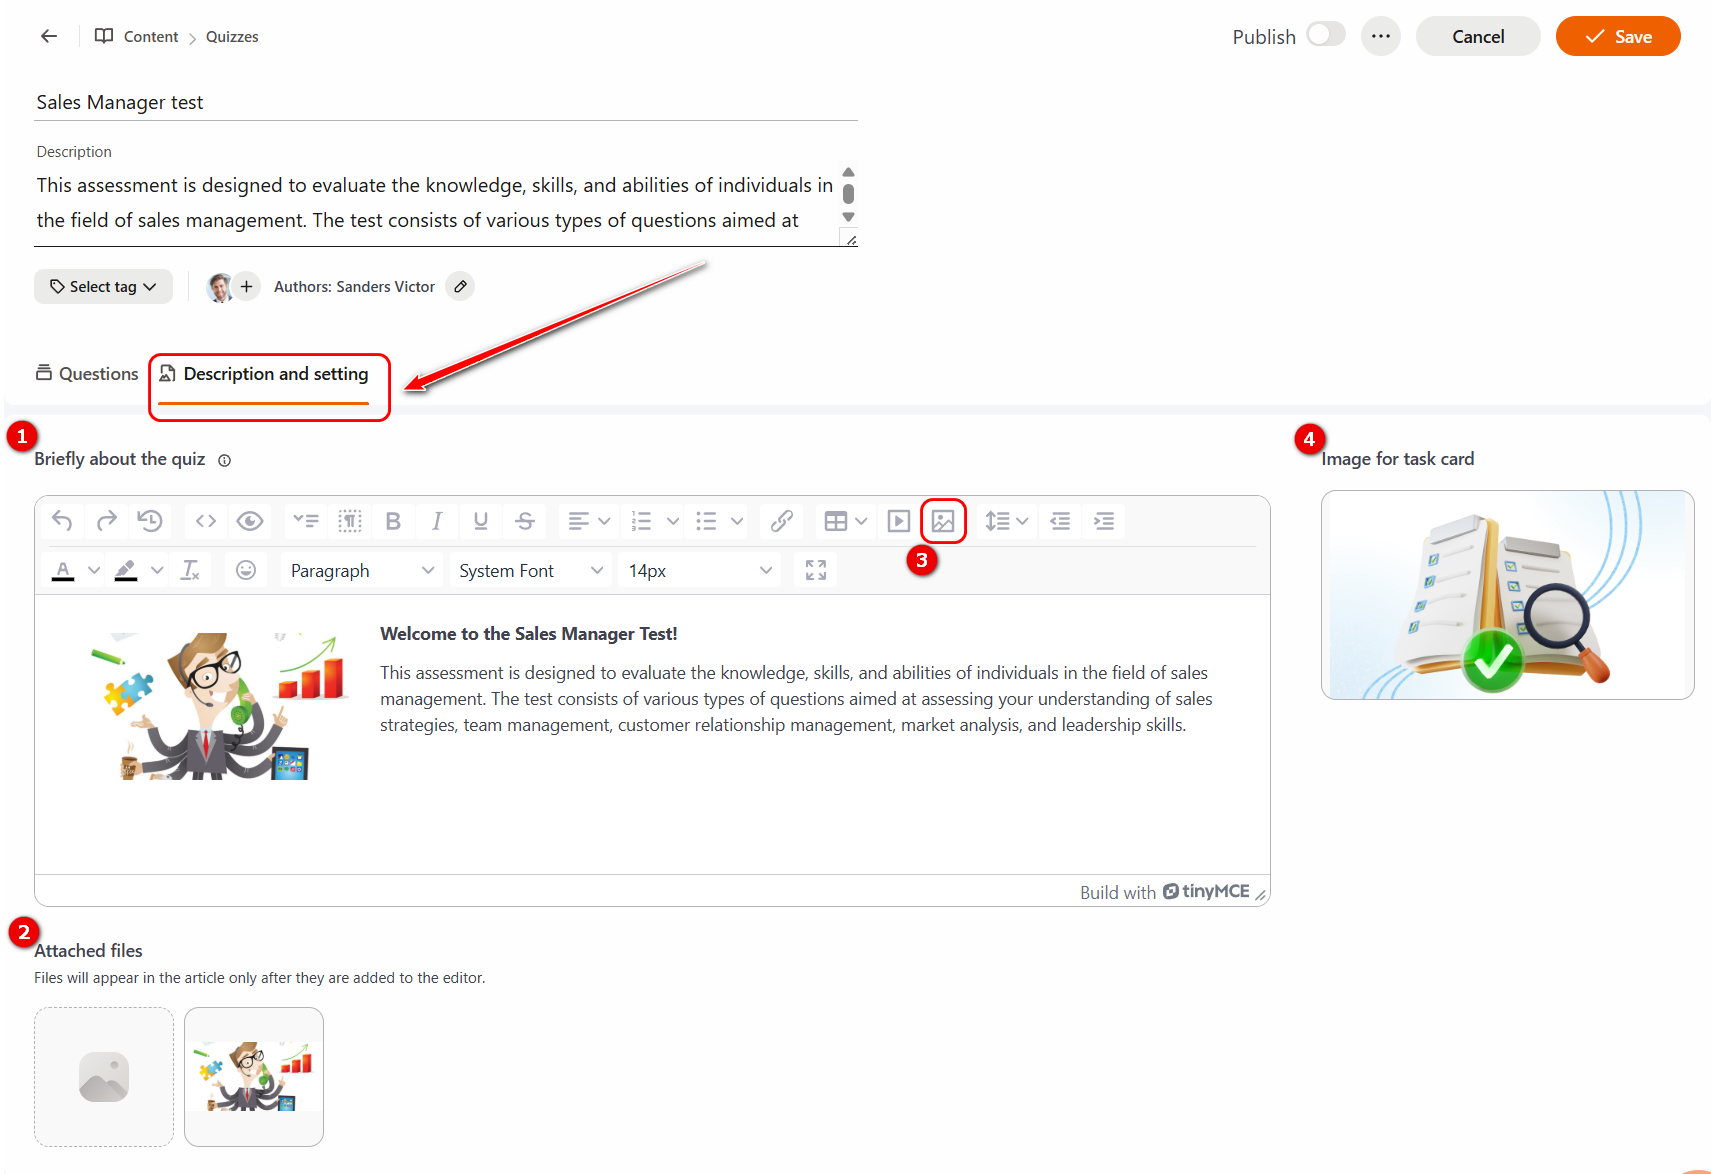
(1) - Briefly about the quiz - information and materials that will be displayed to the user before taking the quiz;
(2) - Attached files - uploading files for use in the text editor of the “Briefly about the quiz (1)“ block via the “Select image (3)” button
(4) - Image for task card - button for uploading an image for the Quiz-task. Allowed formats: jpg, png, jpeg, gif, svg, webp.
Creating a quiz questions
Creating and editing quiz questions is performed on the Questions tab, where the following information is displayed:
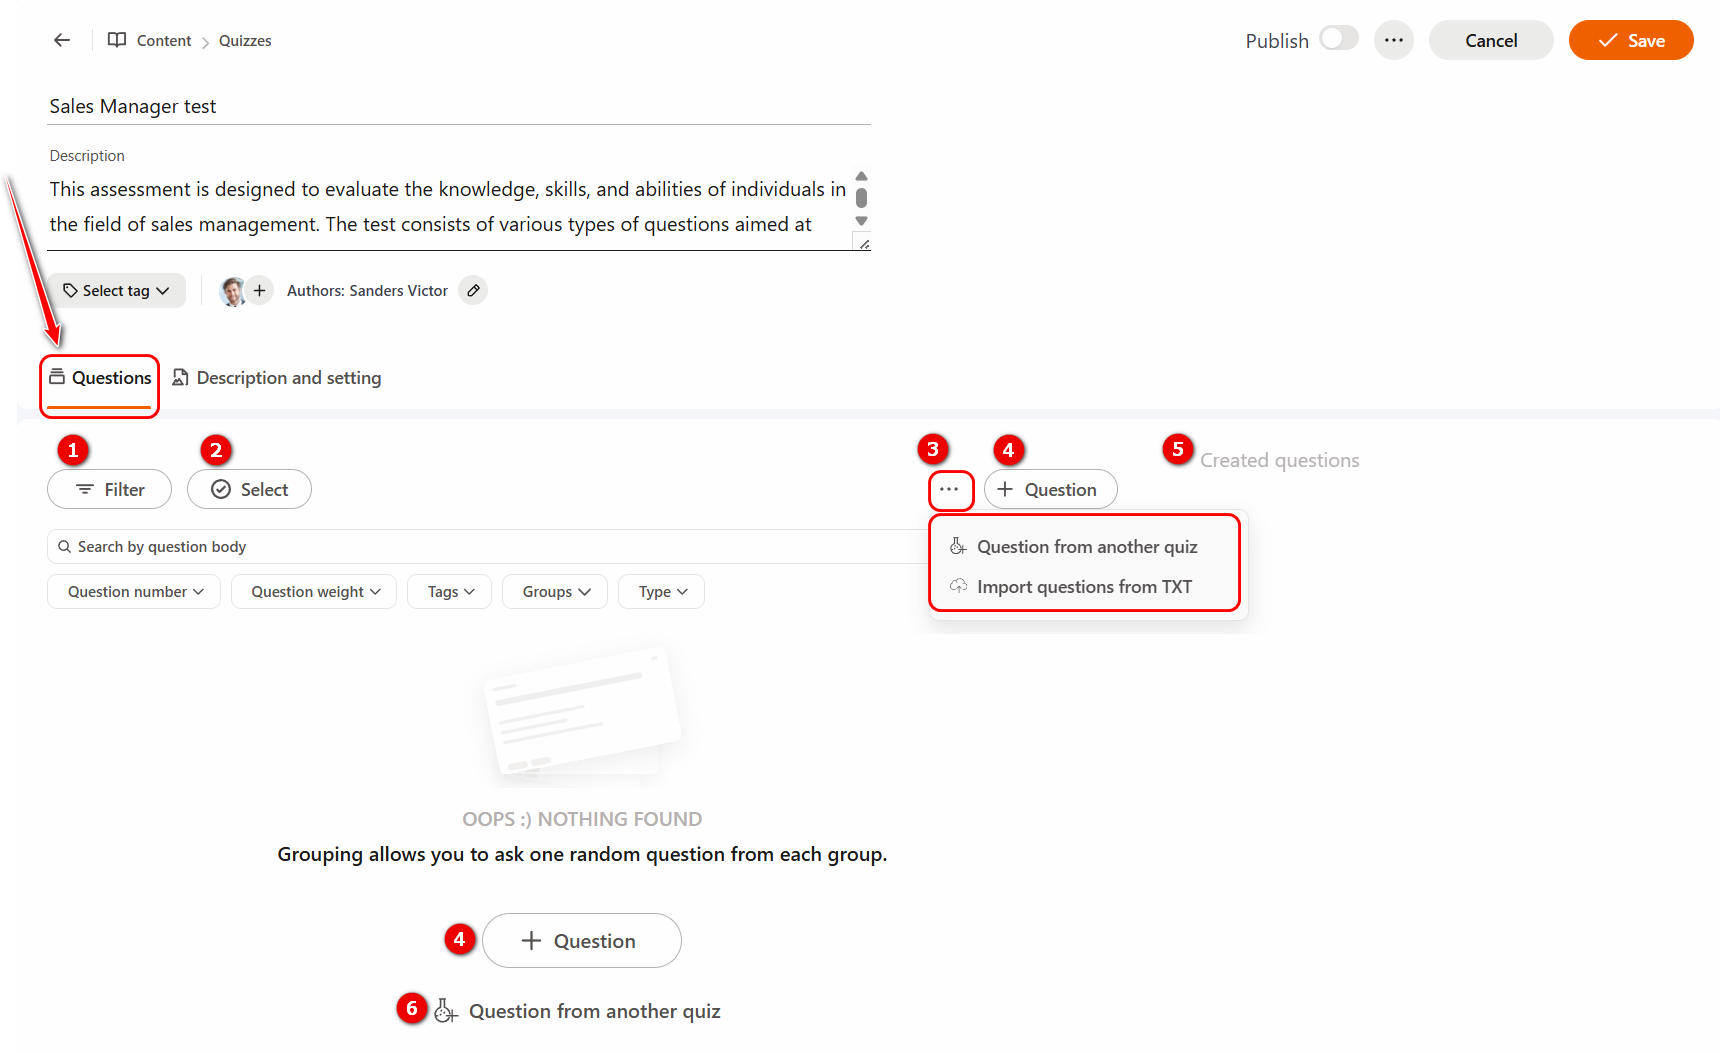
(1) - Filter - a search is available for quiz questions by question text, number, weight of the question, tags, groups, and type.
By default, the filter is disabled.
The filtering fields appear after pressing the «Filter» button.
(2) - Select - button for using group action functions. More details in the section: Group actions with test questions
(3) - Actions Button - the following actions are possible for quick creation of quiz questions:
-
Question from another quiz - adding questions from previously created quizzes. More details: Copying questions from quizzes.
You can also add a question from another quiz by pressing the corresponding button (6); -
Import questions from txt - uploading questions into the quiz from a text file. More details: Import questions from TXT
(4) - Add a new question to the quiz;
(5) - Created questions - a list of all created questions in the quiz is displayed. Initially, in a new quiz, the list is empty and at least one question must be created for it to be displayed.
(6) - Question from another quiz - adding questions from previously created quizzes. More details: Copying questions from quizzes.
To create a new question, click the "Question (4)" button and select the question type:
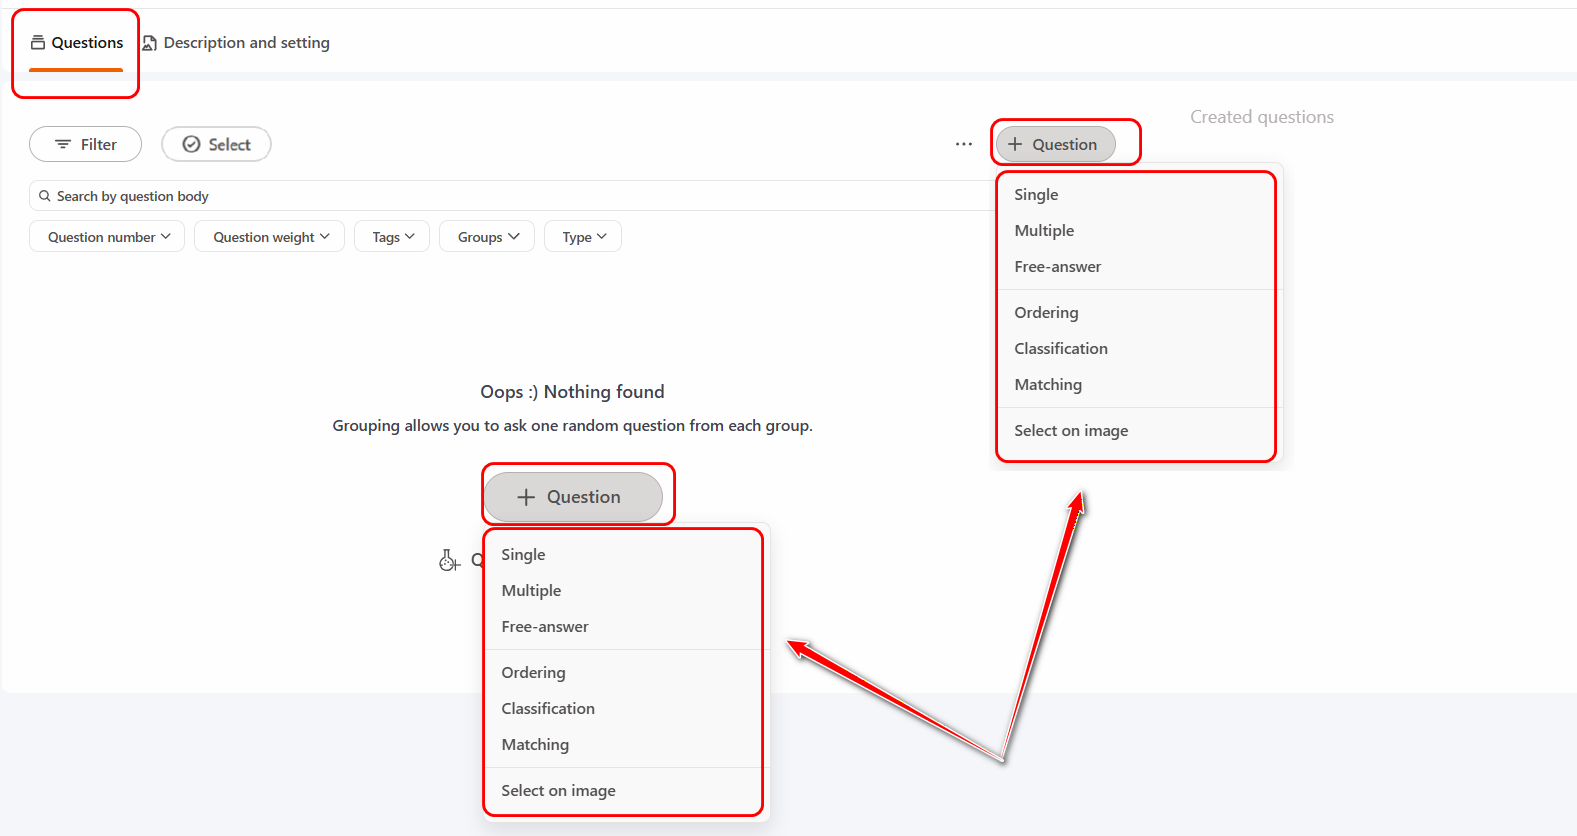
According to the selected question type, fields for completion will be displayed with the following information and settings:

(6) - Question type - available for editing when creating questions. More details about question types in the article Types of questions in quiz;
(7) - Add a hint - this option allows you to add a hint to the question. If enabled, you need enter the hint text in field (11). While taking the quiz, the user will be able to view the hint to choose the correct answer. More details: Quiz: Completing a quiz with hints enabled
(8) - Upload file button - uploading files that, if necessary, can be added to the question text or answer options.
(9) - Actions Button - the following actions are possible for each question:
- Duplicate - duplicating the question along with the answer options;
- Text for correct/incorrect answer - an additional setting that allows customizing the text to confirm correct and incorrect quiz answers (more details Change the text confirmation of the answers in qiuzzes);
- Remove question.
(10) - Sequence number of the question and the text input field for the question itself. When creating questions, sequence numbers are assigned automatically. The administrator can manually change the sequence number of a question: in this case, the system will move the question in the list according to the new value, and the numbering of all other questions will be updated automatically.
(11) - Hint - a text field in which you need to specify the hint text. The field is displayed if the Add a hint option (7) is enabled.
(12) - Answer options - four templates are provided by default for filling in answer options, but if necessary, their number can be increased by pressing the Add variant (14) button. Or decreased by pressing the Remove button next to the template.
The correct answer must be marked using a checkbox.
When hovering the cursor over an answer option, additional tools (13) become available:
- the icon on the left allows changing the order of answers by dragging them;
- Duplicate answer option;
- Remove answer option.
Example of moving, duplicating and removing an answer option.
In the text of the question and answer options, you can use formatting, as well as add images, videos, tables, links, and other hypertext elements. After placing the cursor in the text field, a menu for its formatting appears automatically.
Example of adding an image to the question text and an answer option.
(15) - Select question group. More details about groups in the article Groups for quiz questions.
(16) - Select tag - adding tags if necessary.
(17) - Question weight (in points) - the maximum number of points a User can receive if they provide a completely correct answer to the question. By default, each question is assigned a weight of 1 point. Question weight is usually used if there are questions of varying difficulty in the quiz – fewer points are awarded for simple questions, and more for complex ones.
(18) - Display variants of answer as - selection of the format in which the answer options will be displayed - as a list or as tiles. By default, options are displayed as a list.
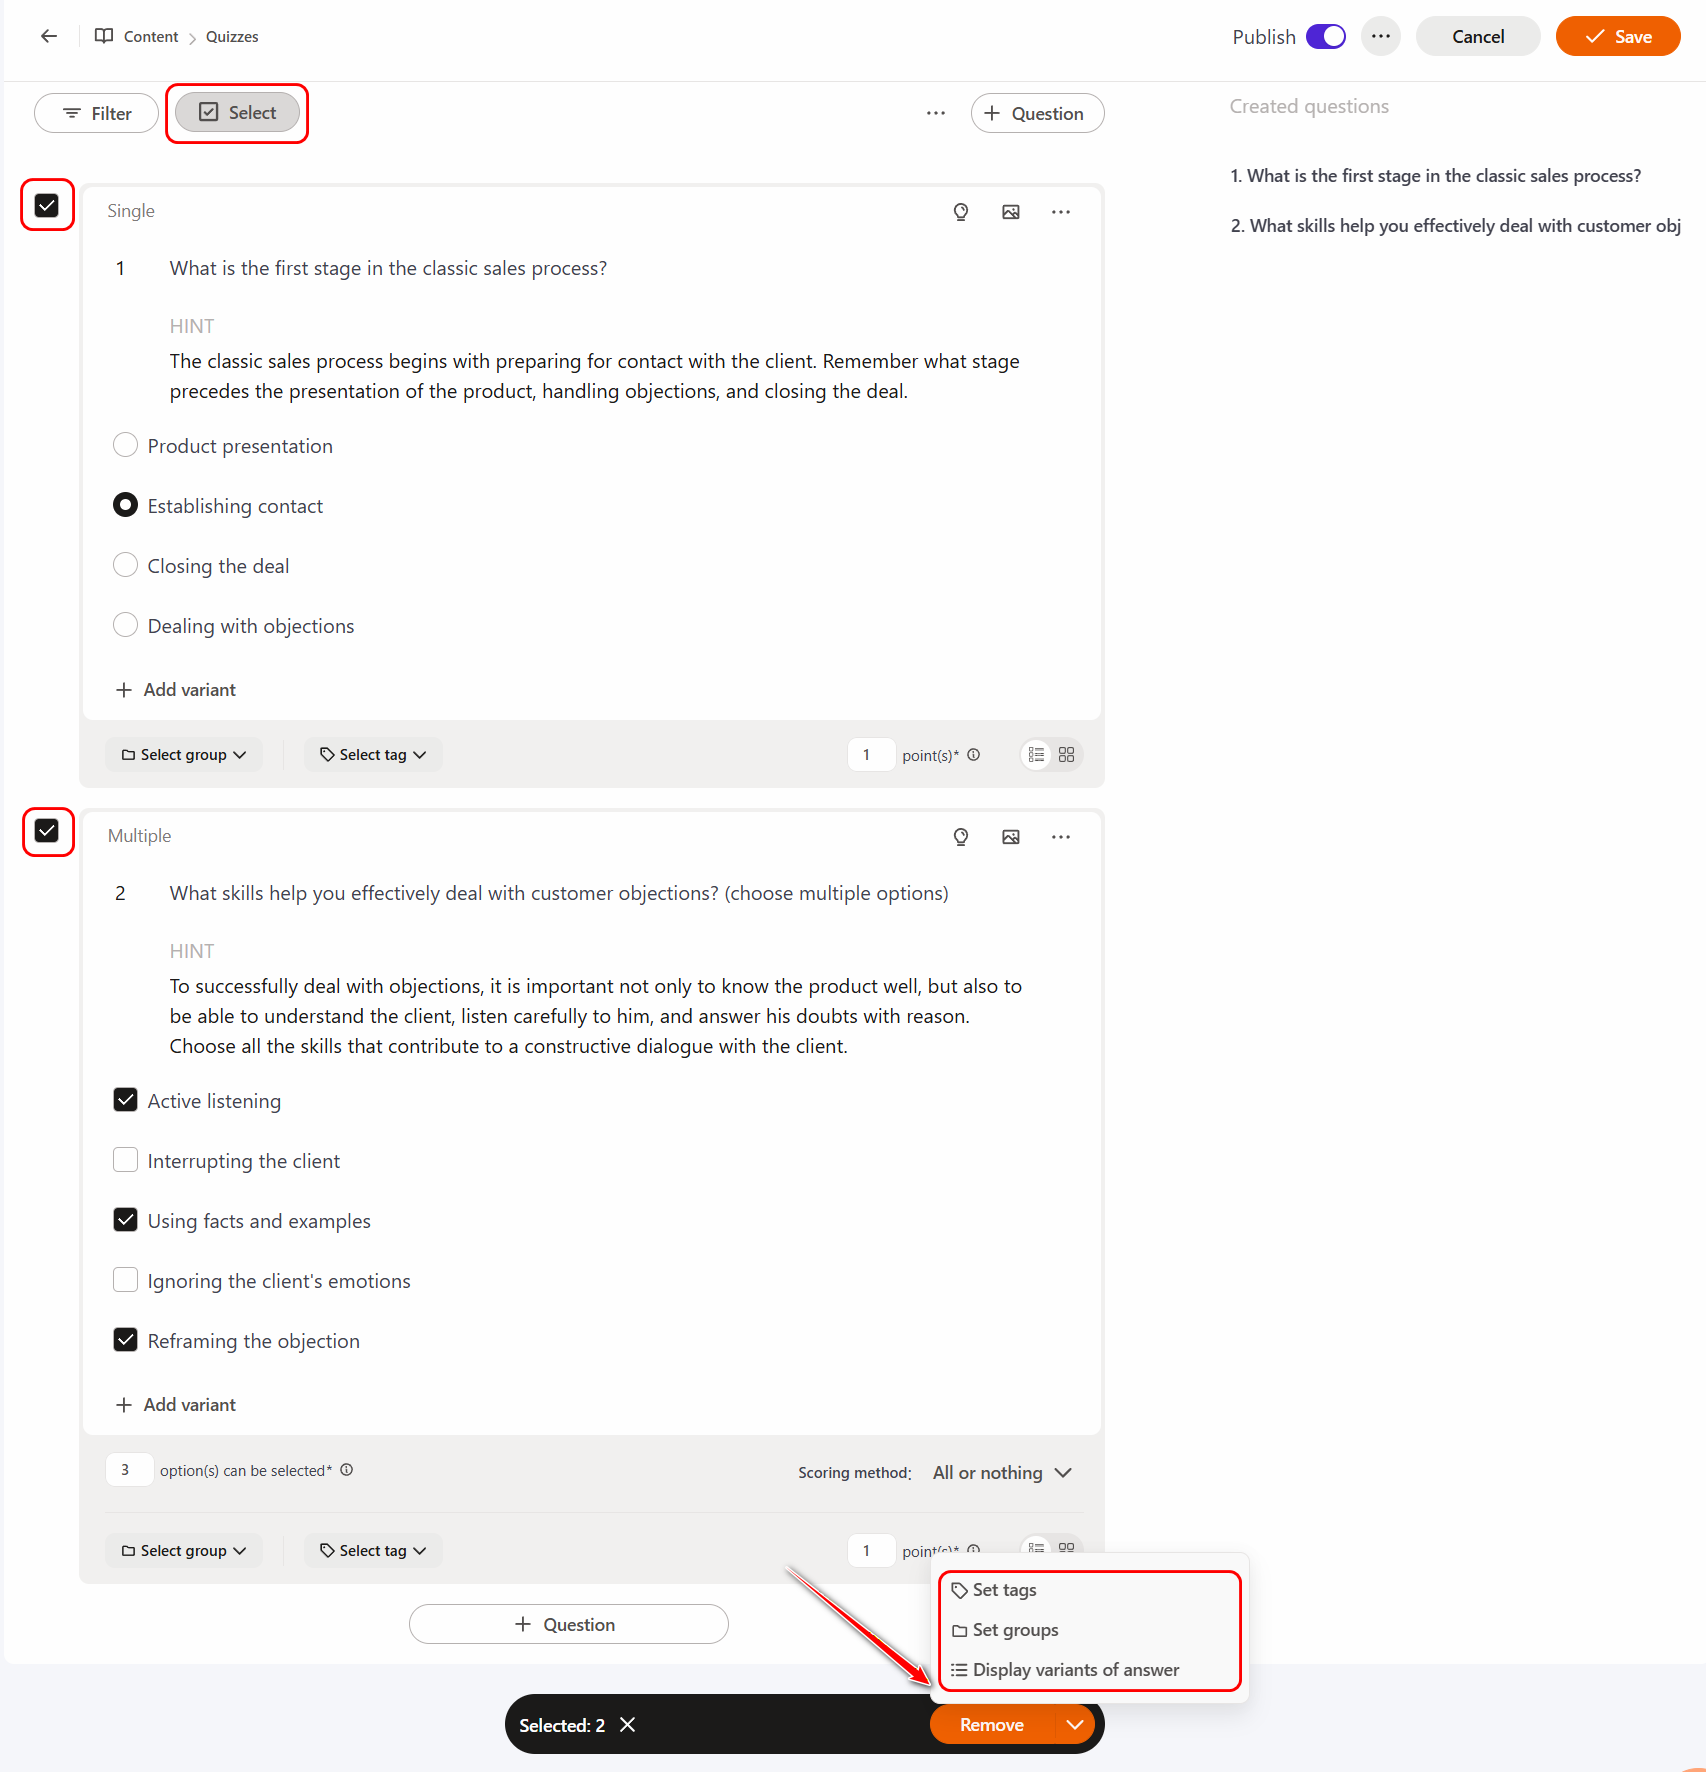
Group actions with test questions
For convenient work with quiz questions, the possibility of group actions is provided.
To do this, you need to click the Select button and mark the necessary questions with checkboxes - after which a panel with available actions will appear at the bottom of the screen.
By default, the "Remove" button is available, and by clicking on the arrow next to it, you can select additional options: Set tags, Set groups, Display variants of answer as list or tiles.
If you uncheck the checkboxes from the questions, the action panel will automatically disappear.
In the future, when creating tasks based on a quiz or when adding a quiz to a course, you can select the necessary quiz settings. Such settings, for example, are the number of questions to be asked, the number of available attempts to take the quiz, the time limit in minutes, as well as the passing threshold (the minimum percentage of success in testing that must be achieved for the quiz to be considered successfully passed). More details in Creating tasks-quizzes