
Creation of assessment by criteria
To create and configure the assessment questionnaire, create a task and assign it to respondents, LMS Collaborator uses the assessment wizard. The wizard allows you to prepare and launch the assessment step by step from one page.
The tool divides the process of preparing and launching the assessment into 4 consecutive stages:
- assessment description;
- parameters setting;
- task creation;
- user assignment.
All stages can be completed sequentially using the wizard, or you can save the data at any of the stages and return to the process of preparing and running the assessment later.
To create an Assessment by criteria, go to the Assessment - Assessment menu.
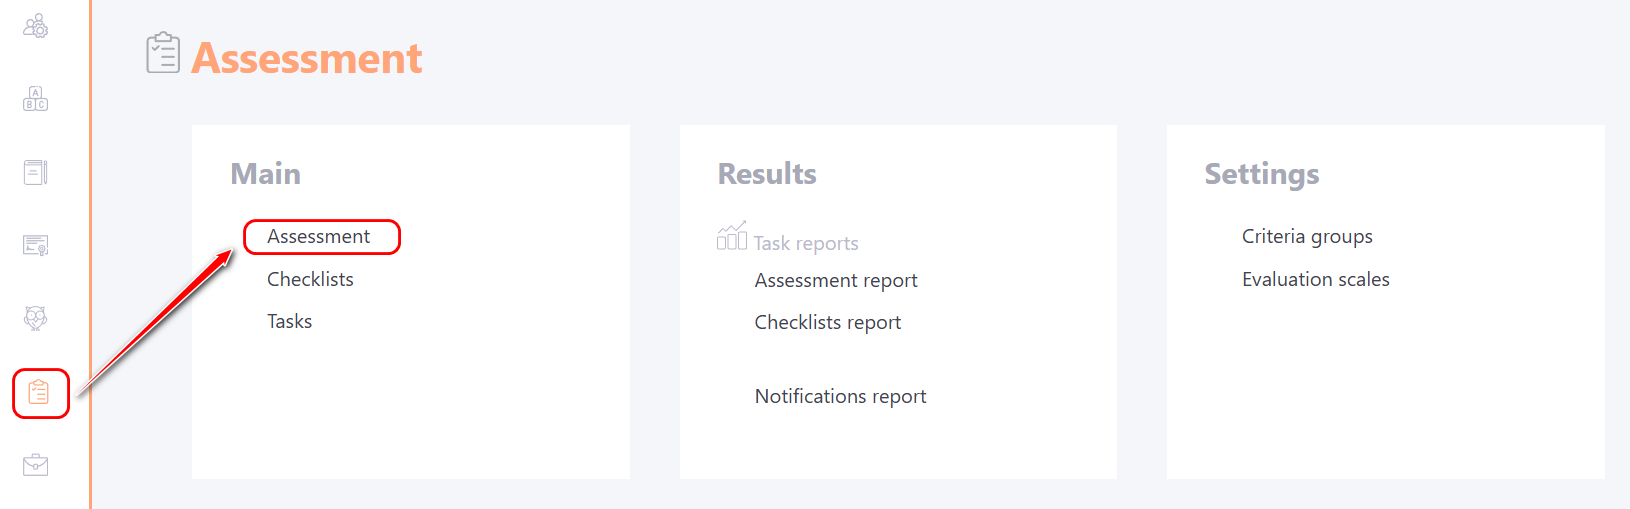
The Assessment page displays a list of all created assessments in a table format.
To create a new assessment, click the Create button.
Stage 1 - Description of the assessment
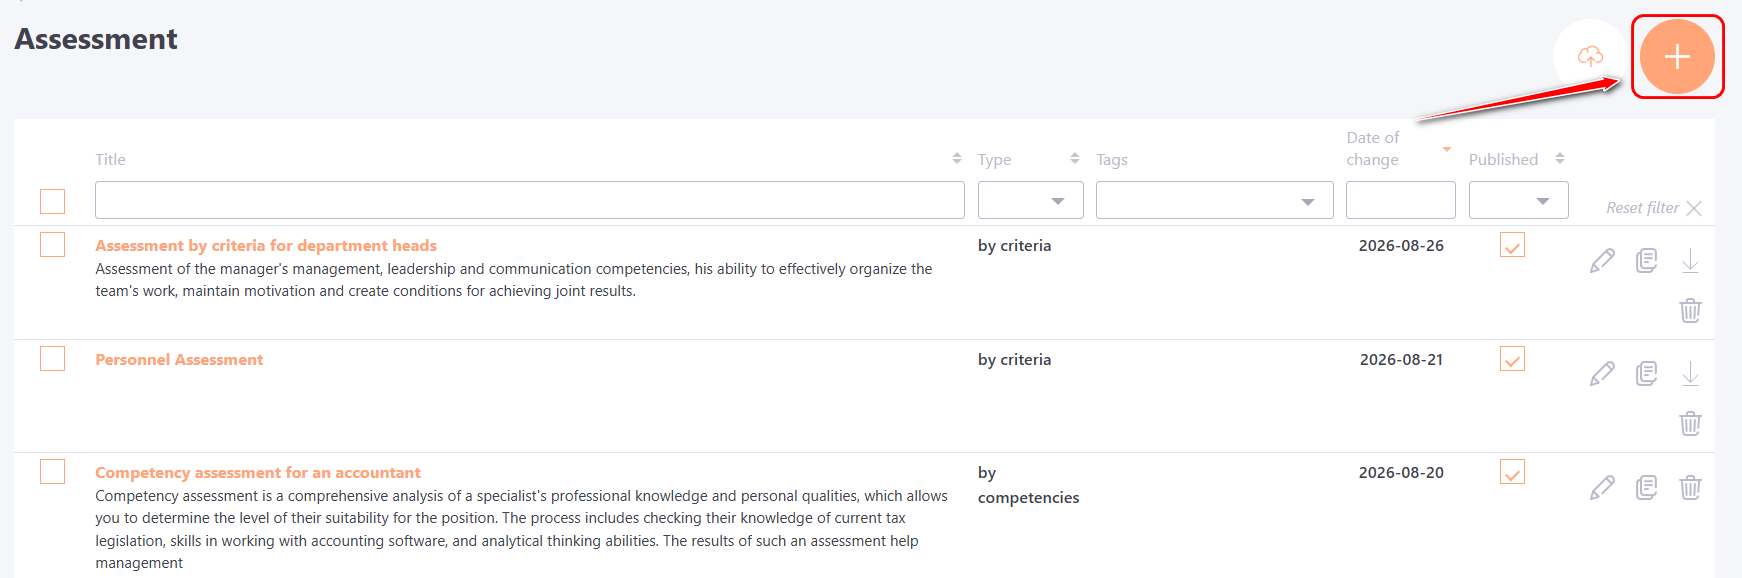
The first step in creating an assessment is to fill in the description.
The following fields are available for filling:
(1) - Title - required field;
(2) - Assessment description - optional field, displayed in the table with the list of created assessments along with the title. The description can use emoticons and the
tag to jump to a new feed;
(3) - Instructions for questionnaire responders - a field for preparing instructions for users who will be assessed according to the criteria. The instructions will be displayed before the assessment begins. Standard text editing and formatting tools are available, and can also be used in the image text. To do this, you need to upload them using the Attach files (4) button.
(5) - Tags - add a tag if necessary.
(6) - Image for task card - upload an image that will be displayed in the task card instead of the standard one.
(7) - Cancel - exit the page of creating an assessment description without saving
(8) - Next - button for switching to the stage of setting the evaluation parameters. The button becomes available after filling in the required fields.
Stage 2 - Questionnaire content settings
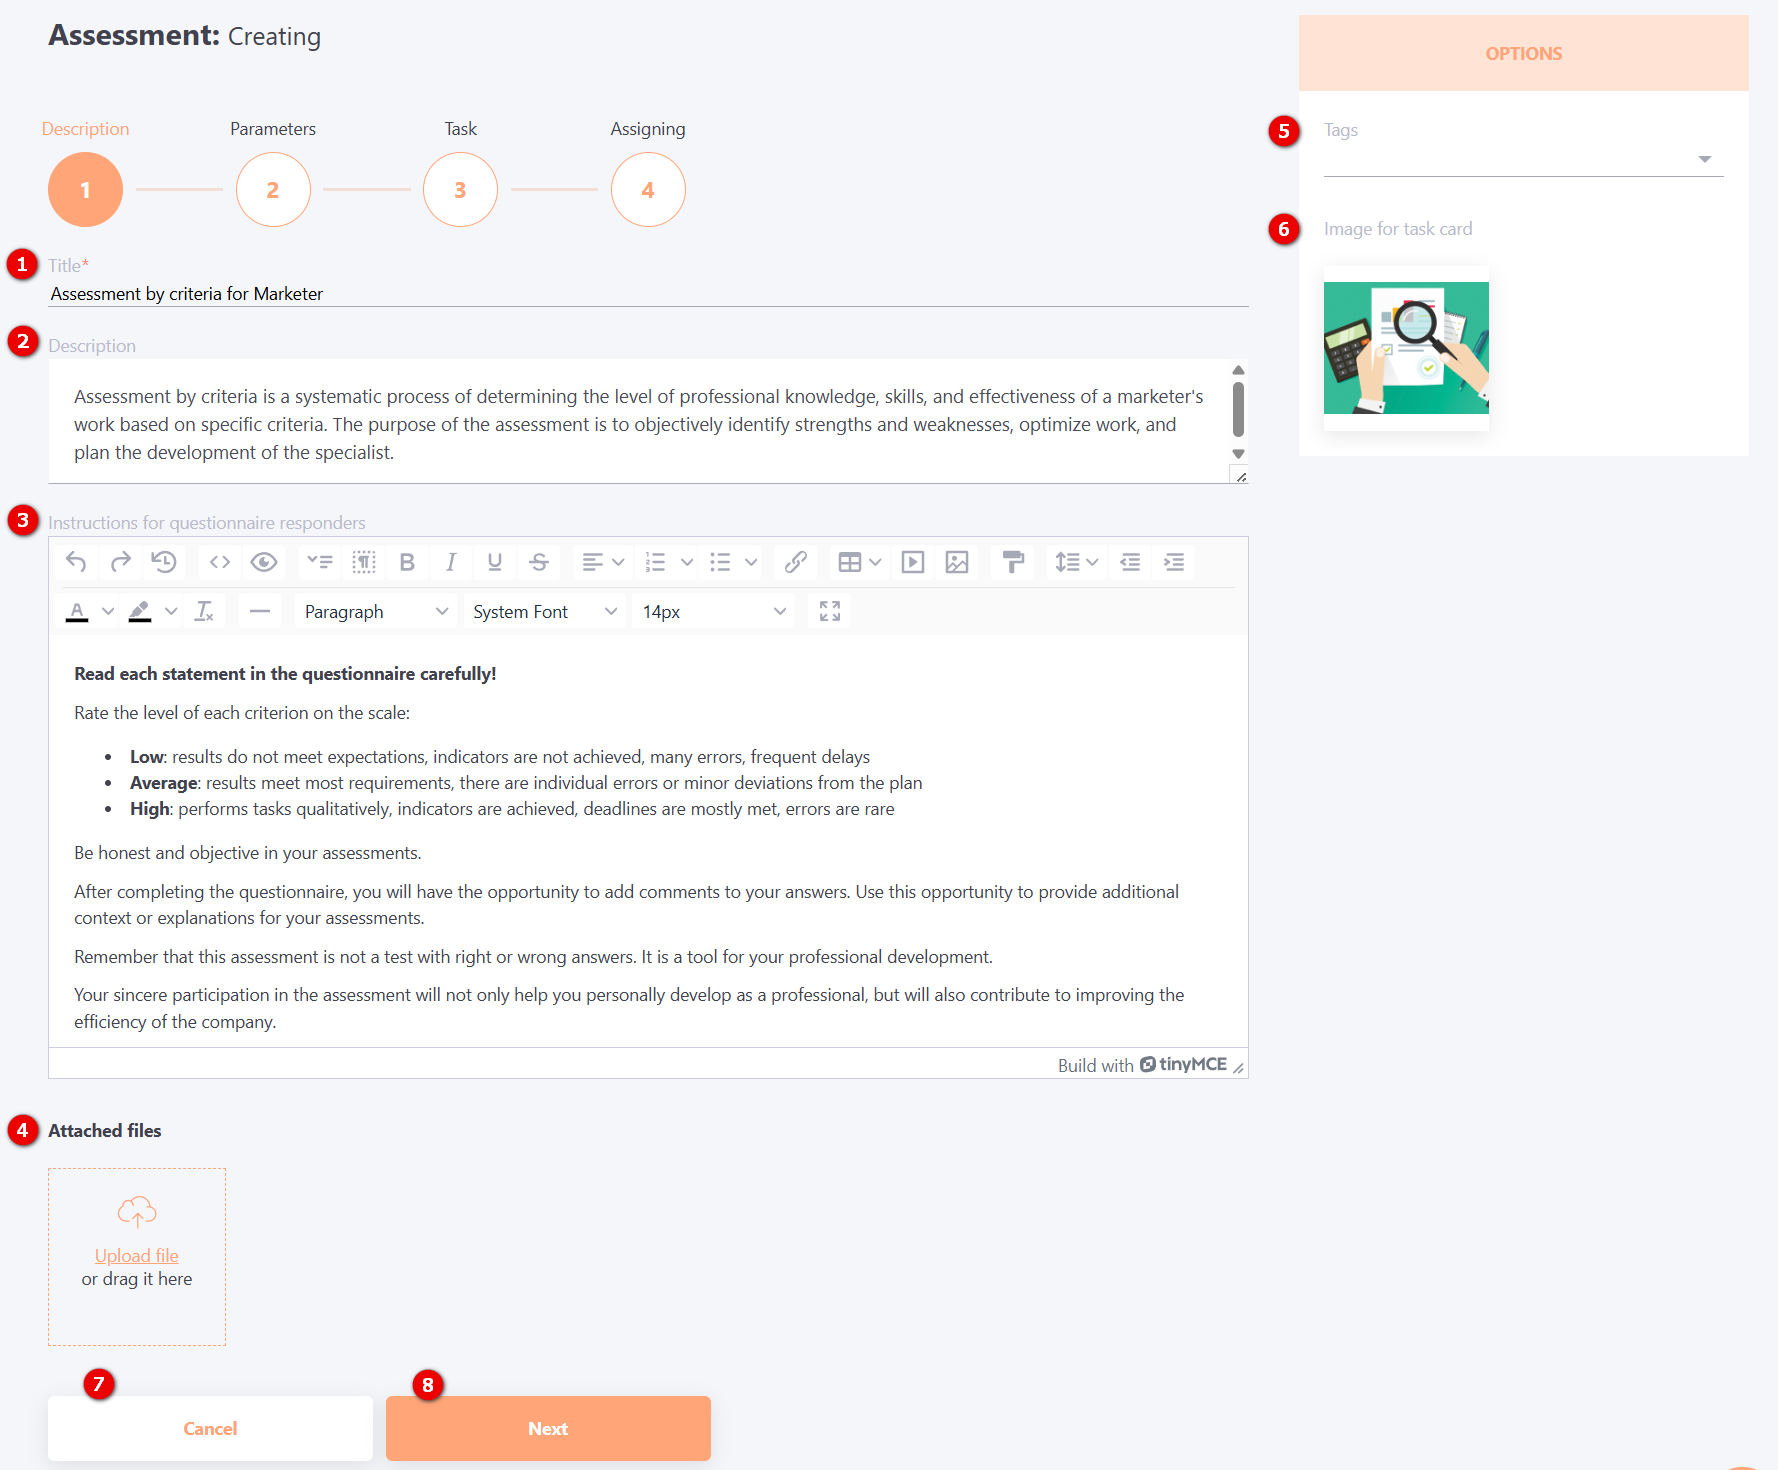
At the second stage, you need to select the type of Assessment:
(1) - by criteria.
(2) - Evaluation scale - from the drop-down list you need select the previously created Evaluation scales.
(3) - Allow commenting on groups of criteria - if the option is enabled, during the assessment the user can leave a comment on the Criteria Group (for example, an explanation of their answers).
The field can be made required - for this, you need to check the "Make a field required" checkbox.
In this case, it will be impossible to save the assessment questionnaire without adding a comment.
(4) - Allow commenting on the answer if the selected grade is more than the norm - if the option is enabled, during the assessment, if the user selects a score that exceeds the established norm, a comment field is displayed.
The field can be made required - for this, you need to check the "Make a field required" checkbox.
In this case, it will be impossible to save the assessment questionnaire without adding a comment.
(5) - Allow commenting on the answer if the selected grade is less than the norm - if the option is enabled, during the assessment, if the user selects a score lower than the established norm, a comment field is displayed (for example, to provide a justification for the low score).
The field can be made required - for this, it is necessary to check the "Make a field required" checkbox.
In this case, it will be impossible to save the assessment questionnaire without adding a comment.
(6) - Allow commenting on the answer if the selected grade matches the value - if the option is enabled, during the assessment, if the marked values are selected, the user will be able to leave a comment.
After enabling the option, it is necessary to check the checkboxes of the score values for which the comment field will be displayed.
The field can be made required - for this, it is necessary to check the "Make a field required" checkbox.
In this case, it will be impossible to save the assessment questionnaire without adding a comment.
(7) - value of 0 means no rating - this option appears in the settings only when the value 0 is used in the Evaluation scale (2).
The option should be used if the rating requires the option "don't know"/"cannot answer". Such an option should be assigned the value 0 in the scale.
After enabling the option, answers with the value "don't know" will not be taken into account when calculating the Overall score.
Next, a list of all created criteria (8) is displayed. From this list, you need to select the criteria that should be included in the assessment. For a quick search, you can use the filter by Criteria Groups (9) and by tags (10); Search (11) by criterion name is also possible.
To add a criterion to the assessment, click the arrow (12) opposite the desired criterion.
A list of all selected indicator criteria (13) is displayed on the right. First, the title of the Criteria Group (14) to which they belong is indicated.
Using the Up and Down buttons (15), you can change the order of the entire group in the assessment. The Remove (16) button allows you to remove the Criteria Group together with all the indicator criteria included in it.
The title of each indicator criterion (17) is displayed below.
For each criterion, you need to set a Norm (18) — select from the Evaluation scale (2) a value that corresponds to the expected level of manifestation of the criterion or the employee's qualification. The set norm is used when analyzing the assessment results.
Using the Up and Down buttons (19), you can change the order of the individual criteria-indicators within the group. To remove an individual criterion from the assessment, click the Remove (20) button .
If you need to use different Evaluation scales for individual criteria in one assessment, you need to use Clusters.
To add a cluster to the assessment, click the Add new cluster (21) button . For more information, see the article Clusters.
(22) - Publish - publication of the assessment. To publish the assessment, you need to check the checkbox.
(23) - Back - the button returns to the page of creating an assessment description, while the selected parameters will not be saved.
(24) - Save and go to the list - the assessment will be saved and you will be redirected to the page with the list of created assessments. In this case, the wizard will be completed. This way, you can prepare the Assessment in advance. To create a task with an assessment, you will need to go to the Learning - Tasks menu.
(25) - Save and create task - move to the stage of creating a task based on the prepared assessment. The button becomes available only after the assessment is published.
Stage 3 - Creating a task
In the 3rd stage of the work with the wizard, you need to create a task based on the assessment that was created in stages 1 and 2.
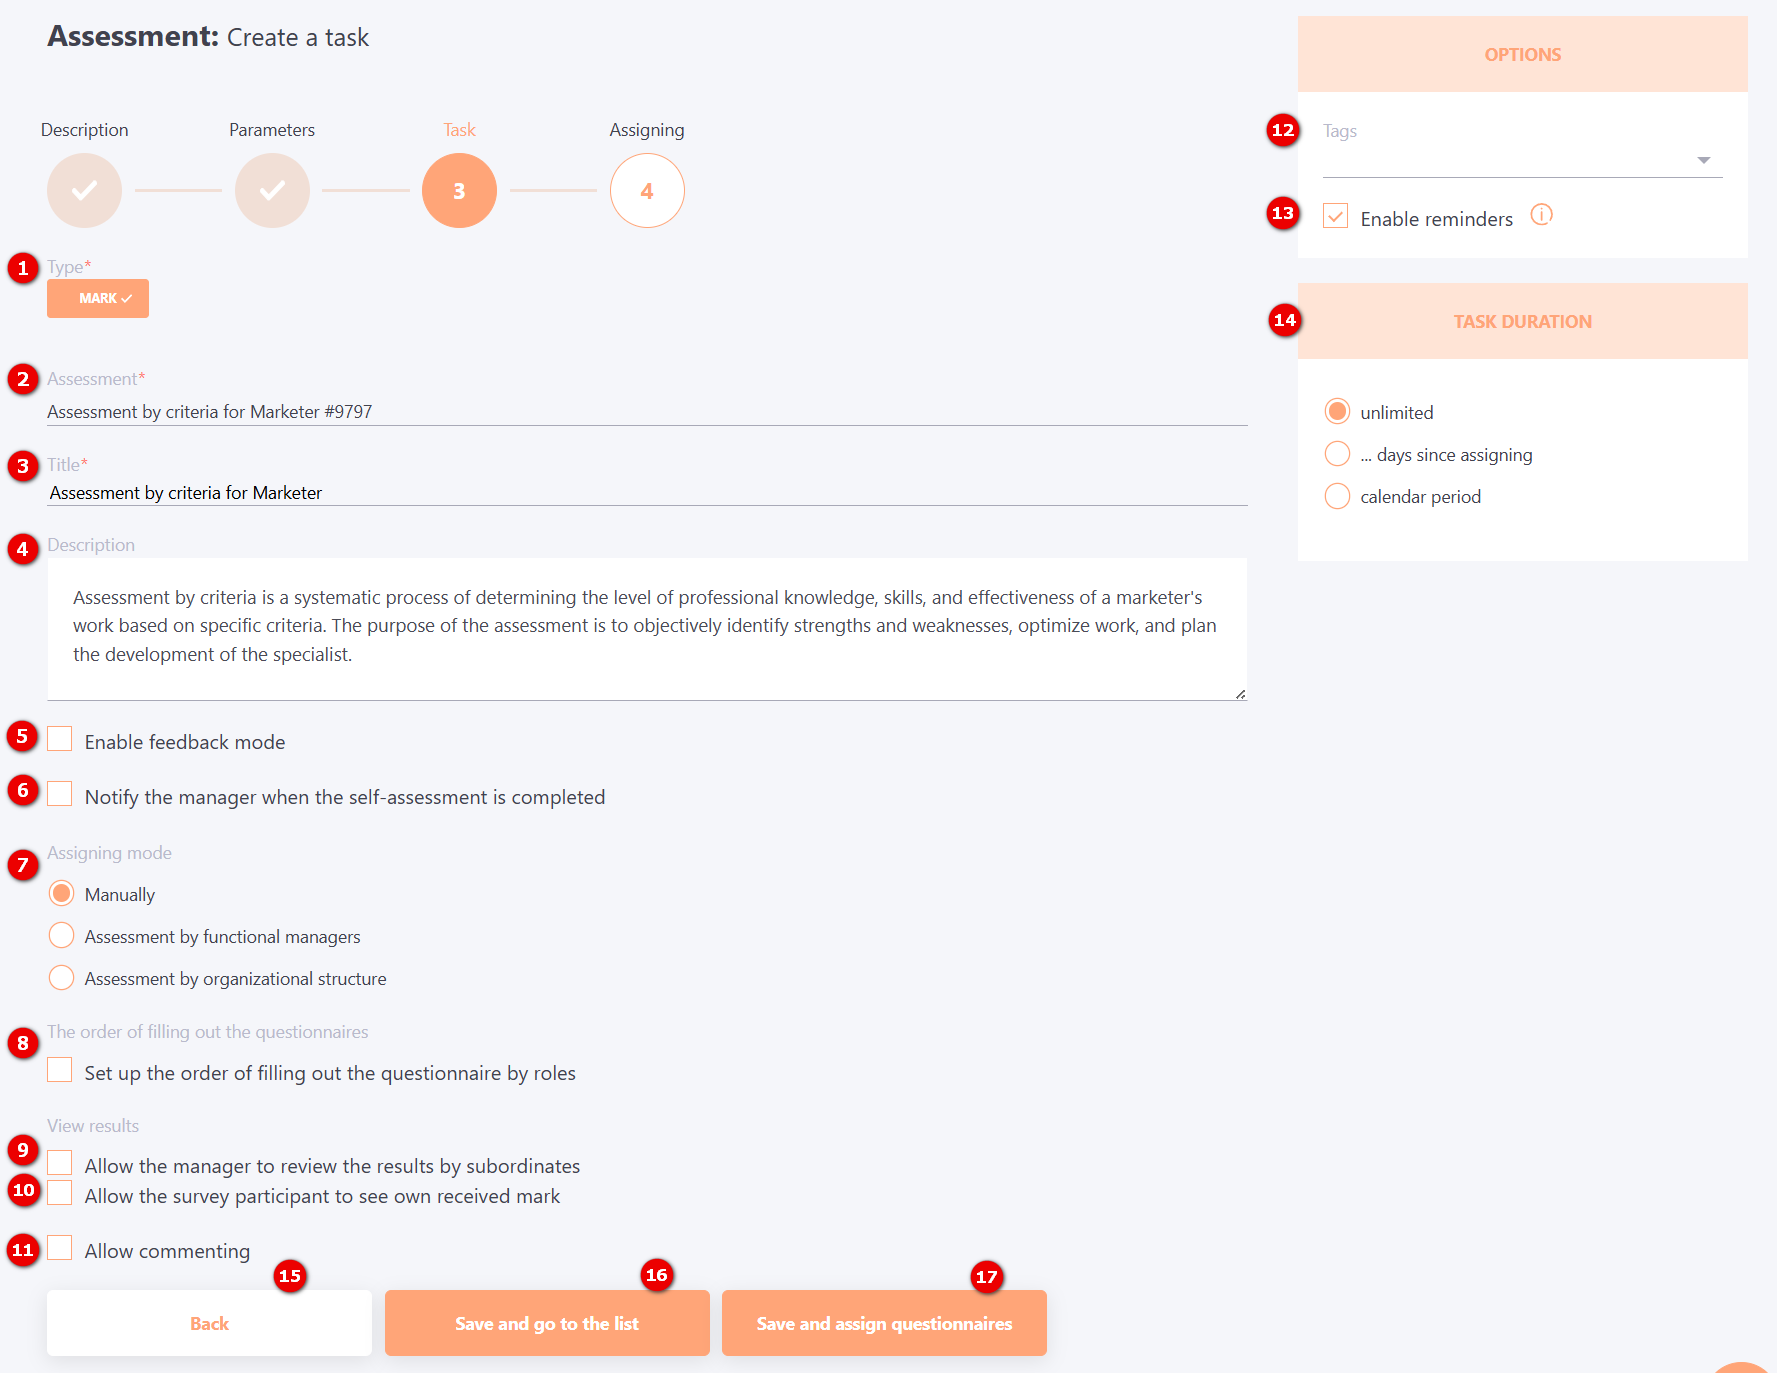
(1) - Type - by default, Mark is selected as the task type in the wizard.
(2) - Assessment - the assessment created in the previous steps is automatically selected.
(3) - Title - this field is automatically filled with the title of the assessment, it can be changed if necessary. Required field, cannot be empty.
(4) - Description - the field is automatically filled with a description of the assessment, it can be changed if necessary.
(5) - Enable feedback mode - this function is used when it is necessary to conduct an assessment in the format of collecting feedback. Read more about this function in the article - Passing an assessment task.
(6) - Notify the manager when the self-assessment is completed - if the option is enabled, the user who is assigned to the assessment as a manager will receive a notification about the self-assessment questionnaire being filled out by his subordinate.
(7) - Assigning mode - the method in which the questionnaires will be assigned to the tasks.
The following options are available:
- manually;
- assessment by functional managers;
- assessment by organizational structure.
Read more about each mode of questionnaire assignment in the article Creating and editing an assessment task.
(8) - The order of filling out the questionnaires - by default, all assigned assessment questionnaires can be filled out by respondents independently of each other. But using this feature, you can customize the order of filling out the questionnaires by role. Read more about the option to customize the order of filling out the questionnaires in the article Creating and editing an assessment task.
(9) - Allow the manager to review the results by subordinates - if enabled, after the subordinates have completed their assessment, the manager will be able to view the Assessment by criteria Report from the assigned tasks page. The report is accessible without the names of the respondents. More information: Manager viewing of assessment by criteria report.
(10) - Allow the survey participant to see own received mark- if enabled, after completing the self-assessment, the user will be able to view the Assessment by criteria Report from the assigned tasks page. The report is accessible without the names of the respondents. More information: User viewing of assessment by criteria report.
(11) - Allow commenting - the option enables the ability to comment on tasks.
(12) - Tags - the ability to specify a tag for the task;
(13) - Enable reminders - If the option is enabled, users assigned to the task will be sent reminders that they have failed or missed this task. You can configure the sending time and frequency of reminders in the "Tasks Reminder" menu on the task list page.
(14) - Task duration - setting the deadline for completing the assessment task. Read more about this setting in the article Creating and editing an assessment task.
(15) - Back - button returns to stage 2 of the wizard without saving the task settings.
(16) - Save and go to the list - the assessment task is saved and you go to the list of all tasks. In this case, the wizard will be completed. To assign a task with an assessment, you will need to go to the task assignment page.
(17) - Save and assign questionnaires - transition to the stage of assigning the created task.
Stage 4 - Questionnaire assignment
At the 4th stage of the wizard's work, you need to assign questionnaires for participants to fill out.
The algorithm for assigning questionnaires depends on the mode of questionnaire assignment selected at stage 3.
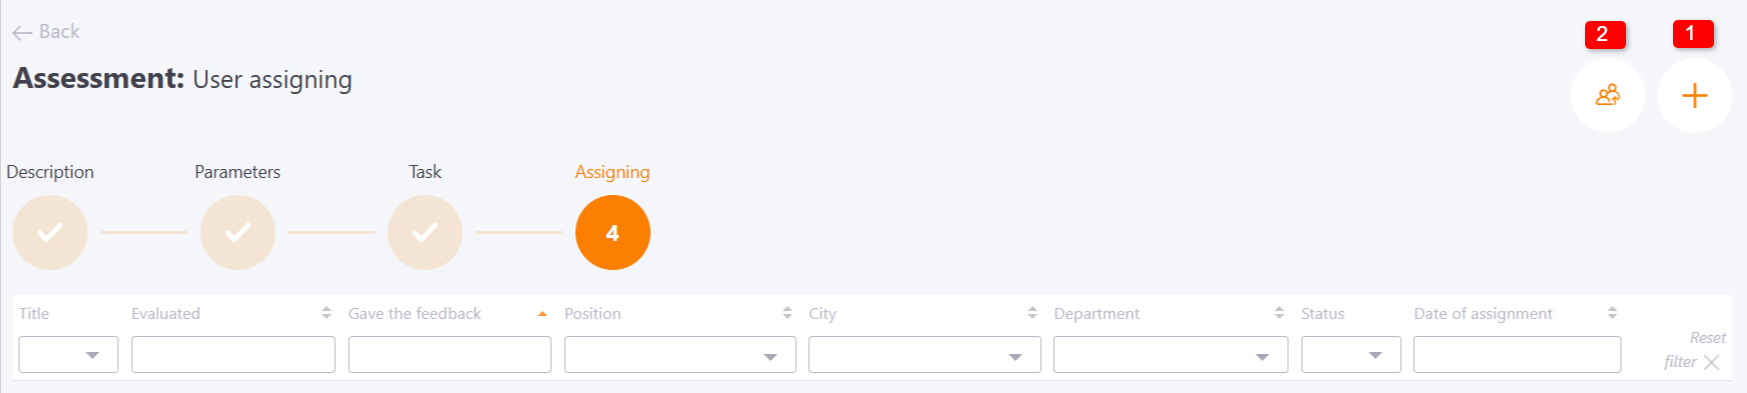
- If the assignment mode manually is selected - it is necessary for each questionnaire to select the evaluated, the respondent and the role in which he will evaluate the questionnaire (add an assignment - button (1)). Alternatively, you can assign users as a list from a File (2).
- If assessment by functional managers or assessment by organizational structure is selected, it is enough to assign users to be assessed and the system will automatically assign questionnaires to respondents according to the relationships of the organizational structure or functional managers.
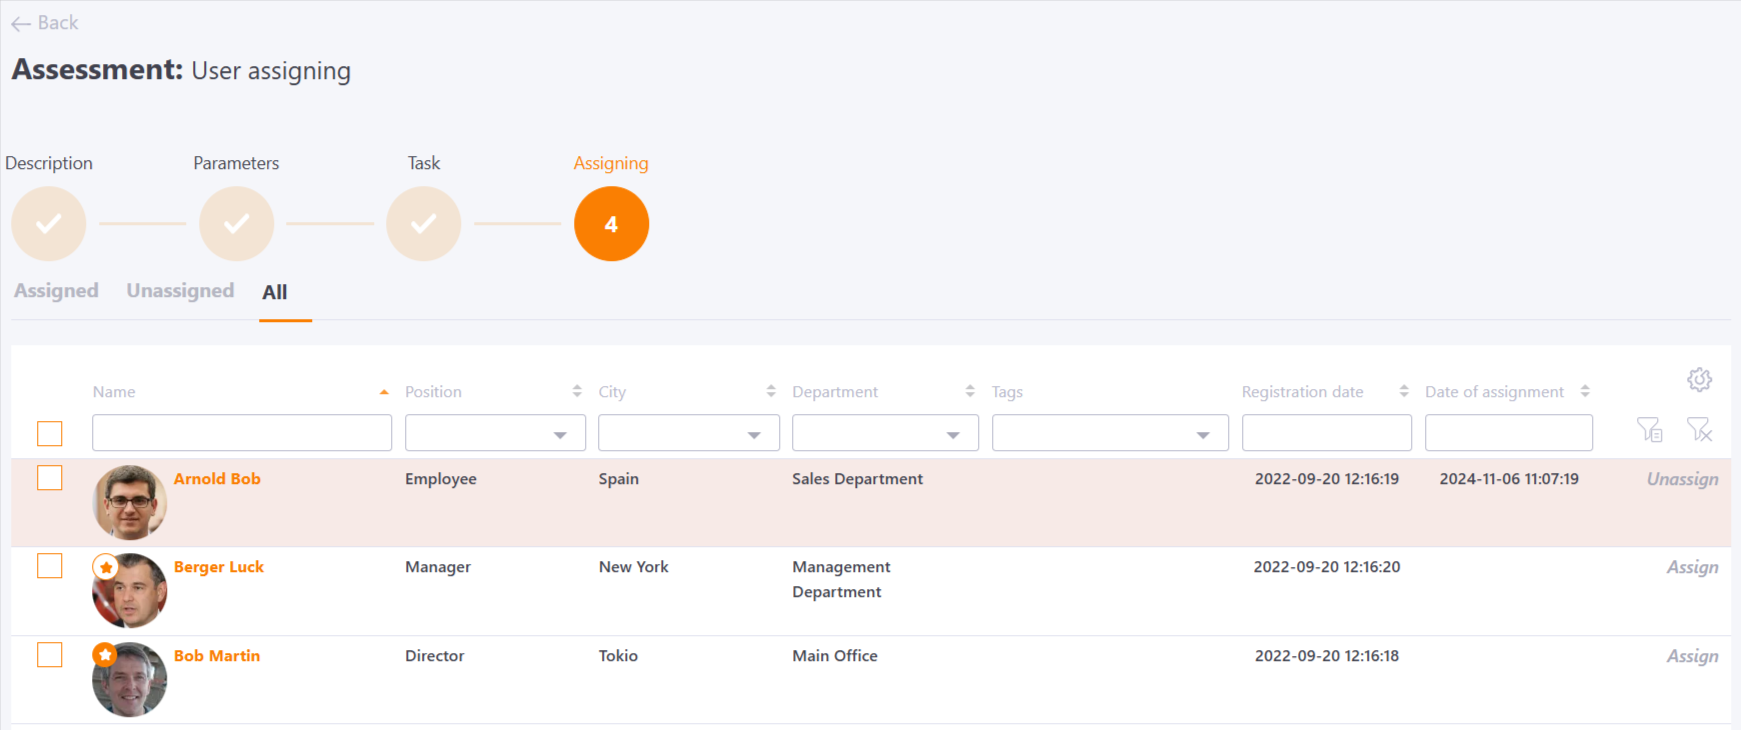
During the assignment of questionnaires, all respondents will receive a notification by Assessment - A questionnaire has been assigned to a user.
Details about the process of assigning questionnaires are described in the article Task-assessment assignment.
The process of completing the questionnaires is described in the article Passing an assessment task.
Viewing reports of the assessment by criteria is described in the article Evaluation report and viewing the results of the assessment by criteria.