Synchronization users using CSV
Preparing the user import file
It is possible to import a list of users in Collaborator. To do this, you must prepare a file in the CSV format that looks in the following way:
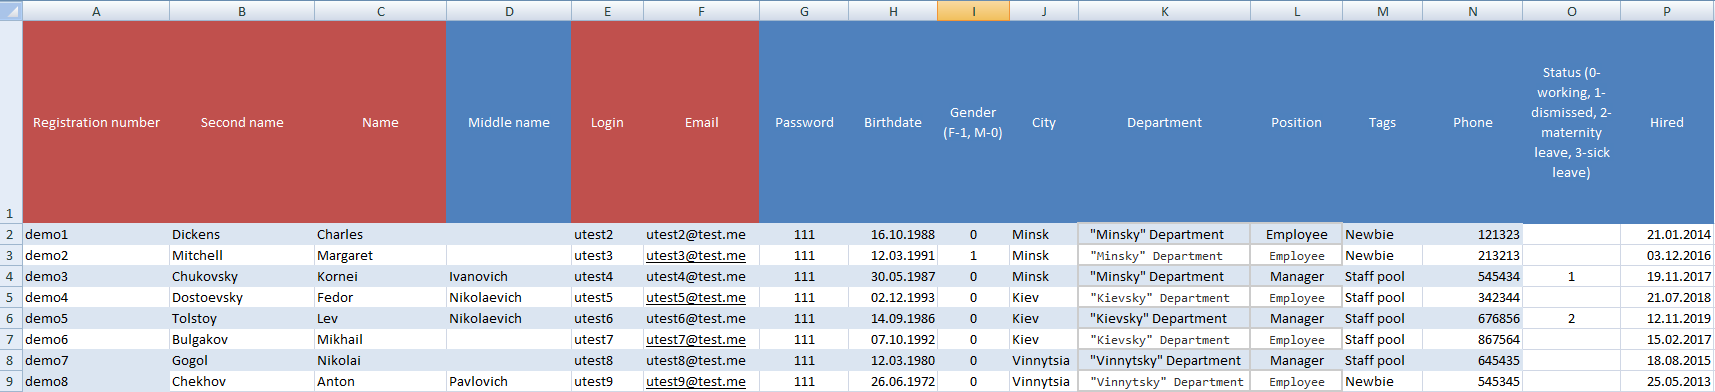
ID;Last name;First name;Middle name;Login;Email;Password;Birthdate;Gender (F-1, M-0);City;Department;Position;Tags;Phone;Status(0 - working, 1 - dismissed, 2 - maternity leave, 3 - sick leave);Employment date;Google Id;Work contacts;Date of current position assignment;department code;Additional field 1;Additional field  2;Additional field  3;JSON;Interface language (EN, UK, DE, ES, ET, TR, RU);Additional field  4;Additional field  5;role_id;Manager Uid;position_level
demo1;Johnson;Catherine; ;demo1;[email protected];123456;16.10.1988;1;New York;Sales Department;Sales manager;sales;671234567;;21.02.2015;;Working phone number.:222, Email: [email protected]; 20.03.2016;;;;;;;;;;ad123456;
demo2;Miller;Brandon; ;demo2;[email protected];123456;31.03.1991;0;New York;Sales Department;Head of Department; ;971234567;;02.04.2014;;;;;;;;;;;;;ad123456,ad123457;
demo3;Smith;Johnson; ;demo3;[email protected];123456;19.03.1982;0;New York;Sales Department;Sales manager; ;631234567;1;12.05.2013;;;;;;;;;;;;;a3123410541;
demo4;Williams;Olivia; ;demo4;[email protected];123456;30.05.1972;1;Kyiv;Sales;Seller;trainee;981234567;;02.04.2014;;;;;;;;;;;;;ad123475;
demo5;Brown;Amelia; ;demo5;[email protected];123456;04.09.1972;1;Tokyo;Sales;Seller;trainee;953425623;2;02.04.2014;;;;;;;;;;;;345;ad123456;
This is how a table of accounts is set up. The first line contains the column headers of the table. All other lines of the file are records in the table. Each cell is separated by semicolons.
Data fields:
| field | function |
|---|---|
| ID | mandatory to fill in, a unique identifier of a person, can be an identification number or a registration number |
| Last name | mandatory to fill in |
| First name | mandatory to fill in |
| Middle name | - optional |
| Login | mandatory to fill in |
| mandatory to fill in | |
| Password | - optional, then it will set a default password |
| Birthdate | - optional |
| Gender (F-1, M-0) | - optional |
| City | - optional |
| Department | - optional |
| Position | - optional |
| Tags | - optional, contains tags that will allow you to find the user, separated by commas, you can specify multiple tags |
| Phone number | - optional |
| Status (working - 0, dismissed - 1, on maternity leave - 2, sick leave - 3, etc.) | - optional, default value = 0 |
| Employment date | - optional, contains the official date of employment with the company, which determines the total length of service with the organization |
| Google Id | - optional, User's Google Id for authorization via Google |
| Work contacts | - optional, additional contacts for users, working phone number and Email |
| Date of current position assignment | - optional, contains the date of appointment to the position, the date determines the term of employment |
| Department code | - optional, contains a unique subdivision code for automatic allocation of the user in the organizational structure |
| Additional field 1 | - optional, an additional field in the user profile |
| Additional field 2 | - optional, an additional field in the user profile |
| Additional field 3 | - optional, an additional field in the user profile |
| JSON | - optional, an additional field. Designed to transfer service information about the user in JSON format using BASE64 encoding. It is not displayed in user's profile. Example of data that are encoded: {"projects":["mtr-1", "mto-232"], "vacation_days":21, "sick_leave_days":9} |
| Interface language | - optional. The language of the user interface is specified, if it differs from the main language. Possible values: EN, UK, DE (German), ES (Spanish), ET (Estonian), TR (Turkish), RU (Russian). |
| Additional field 4 | - optional, an additional field in the user profile |
| Additional field 5 | - optional, an additional field in the user profile |
| role_id | - optional, you can transfer id of role, that will be assigned to the user after import |
| Manager Uid | with the setting detecting subordinates by import value mode enabled it is possible to transfer user managers |
| position_level | - optional, user Position level |
The Department code field can contain multiple departments if the necessary settings are enabled (only for detecting subordinates by import value mode. Similarly you can transfer several managers in the Manager Uid field.
A cp1251-encoded file opens correctly in any version of MS Excel and is displayed as a table where data can be changed.
For more information on how to edit a file, visit How to change the import file
Excel template for employee list
If you do not upload a .csv file with a list of employees from the HR system, but maintain a separate list of users for LMS, then you can use an Excel template with a macro that generates a .csv file for import in the required format.
All information on changes in the list of employees must be entered into this Excel file (adding new employees, dismissal, changing data, etc.), after updating, by clicking on the "Create file for uploading to Collaborator" button, an import file will be created, which will need to be uploaded to the portal.
New accounts in Collaborator are automatically created based on the data in this file during import. Existing accounts in the system for which an identifier is specified (see the first column of the file) will be updated.
Features of importing and updating some attributes
Tags
Each user can be assigned one or more tags in the CSV file. The tags will be transferred to the accounts in Collaborator. They allow you not only to mark a user's belonging to a group, but also to quickly find the necessary person by the specified characteristics. For example, it is convenient to use the names of study groups and professions as tags.
While updating user data during import, there is an option Do not overwrite existing tags when importing.
-
If this option is disabled, then All tags from users in the system will be replaced with the ones that come in the import data. Including, if no tags come in during import, then All existing tags will be deleted.
-
If the option is on, then no existing tag will be deleted during import, even if there are no tags with the import.
- If new tags arrive with the import, they will be added.
- If any tags already exist, they will be ignored.
- In this case, you can only delete tags from the user manually through the functionality interface User table.
If there is a need to add tags to users manually, then this option should be turned off.
During import, you can specify several tags at once. To do this, just list them separated by commas, for example as follows:
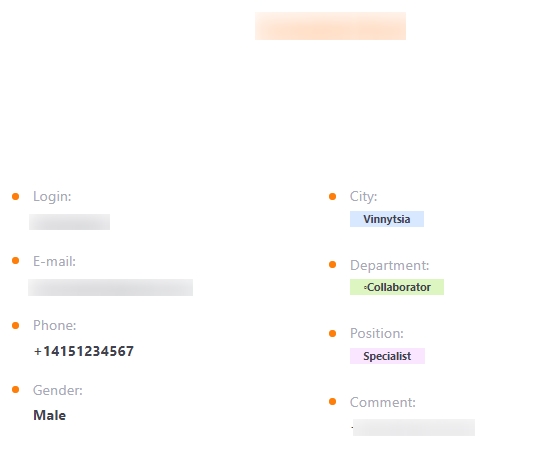
Separate attributes of an account are City, Department, and Position. They are necessary for Organizational structure and 360-degree feedback in Collaborator.
Phone numbers
Each user can be given a phone number in the CSV file. The phone number is added as a separate field after the Label. After importing, the data with the number is available to the administrator, to the user in his profile and in the Contacts menu.
The user's phone number is used to send additional SMS messages.
You can specify phone numbers in the import file in several ways:
- Without a country code.
In this case, all numbers will be assigned, the country code that is specified in the settings of the site. If, for example, in the settings set the default phone code of Ukraine, then after importing the field with the phone will be filled as follows:

The country code can be changed manually, but after the next import it may change back to the default code on the site
- With the country phone codes. The use of this variant is appropriate when users with phone numbers of different countries are present in the same file
+749278592421
+147638265836
User roles
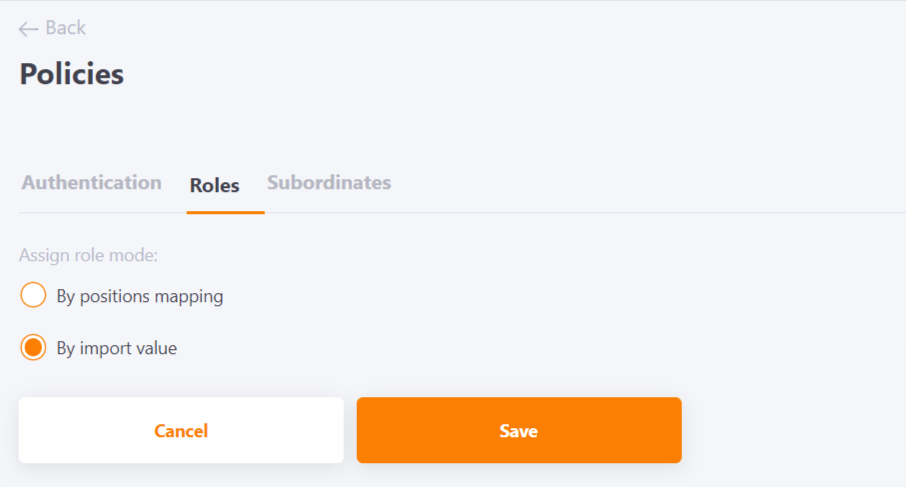
Each user in CSV-file can be assigned an id of role, that will be assigned to them after importing. This way the role assignment can be automated. The required role id can be found out from Support.
It is also necessary that the policy for Role - Assign role mode: By import value is enabled.
User import process
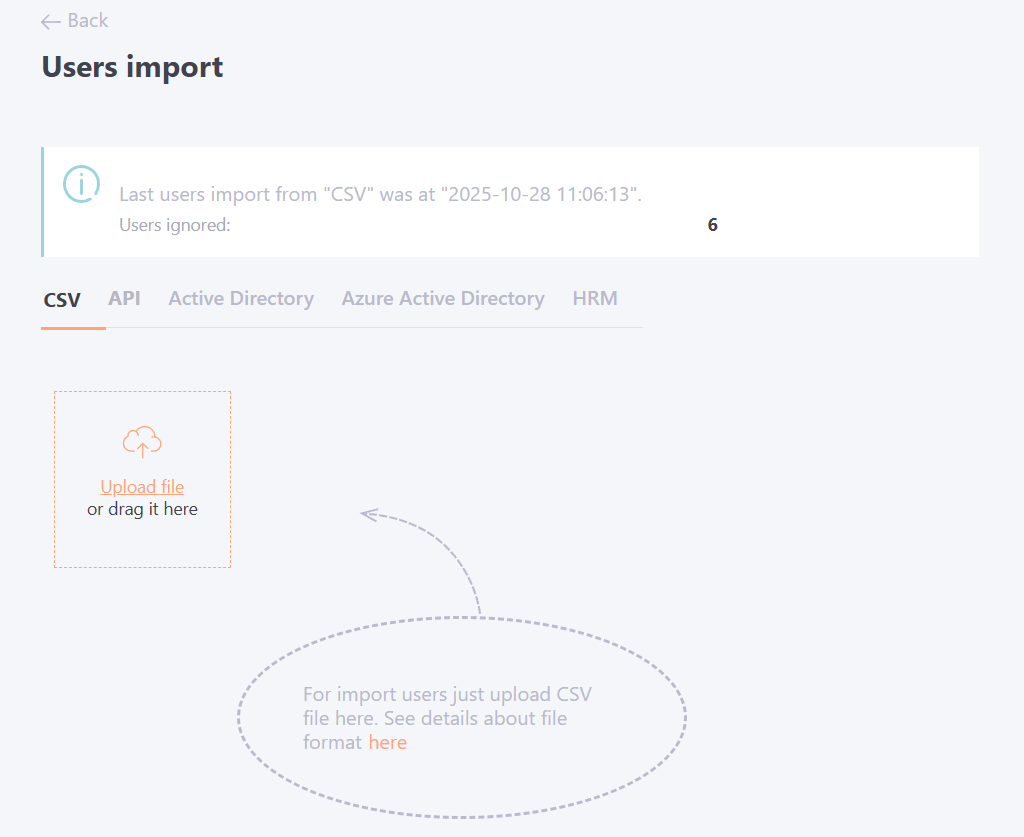
To import Users into the Collaborator system, you need to upload a prepared import file by clicking the Users Import button, after which the page for uploading the file will open.
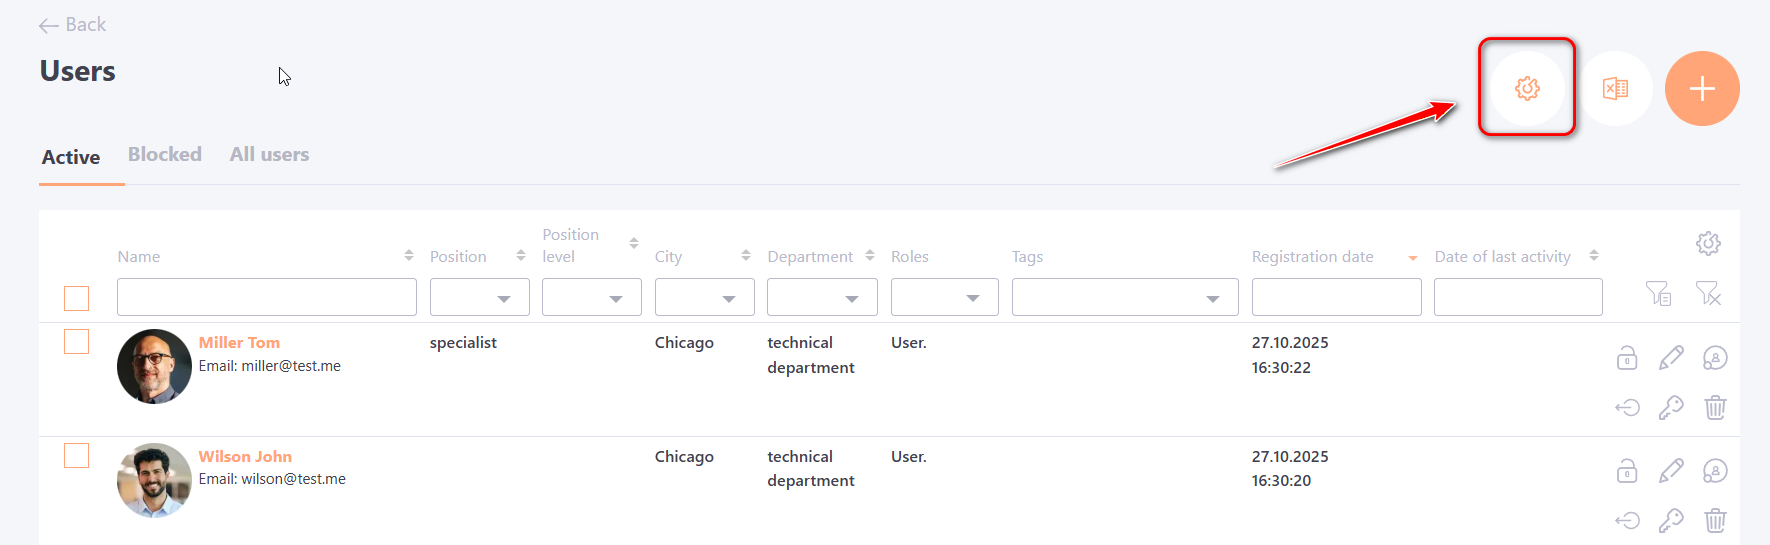
On the Users Import page, under the CSV tab, click the Upload File button and select the desired file from your computer, or drag and drop the file onto the specified button.
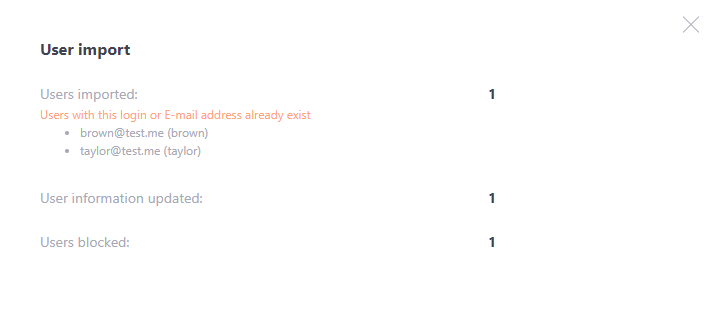
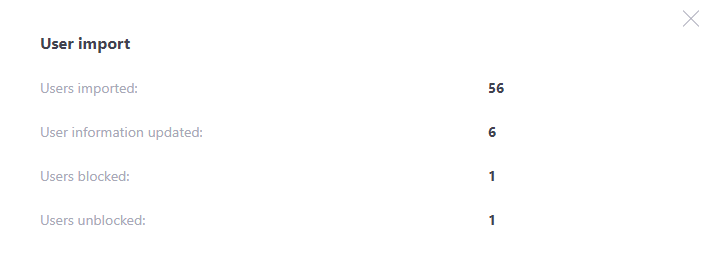
When the upload is complete, new users will be added to the System, and existing users will be updated if there were changes in their import file:
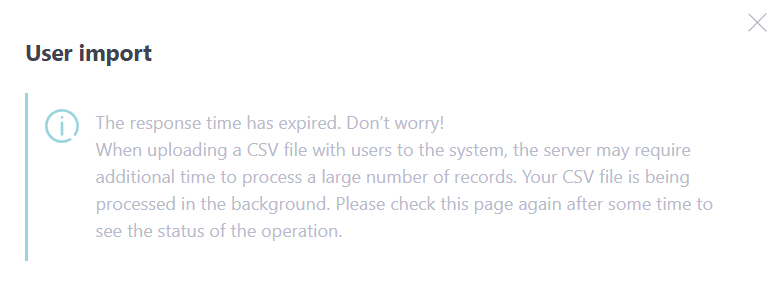
If the imported file includes more than 1,000 users, the upload process may take some time. In this case, the CSV file will be processed automatically in the background, allowing you to continue working in the system.
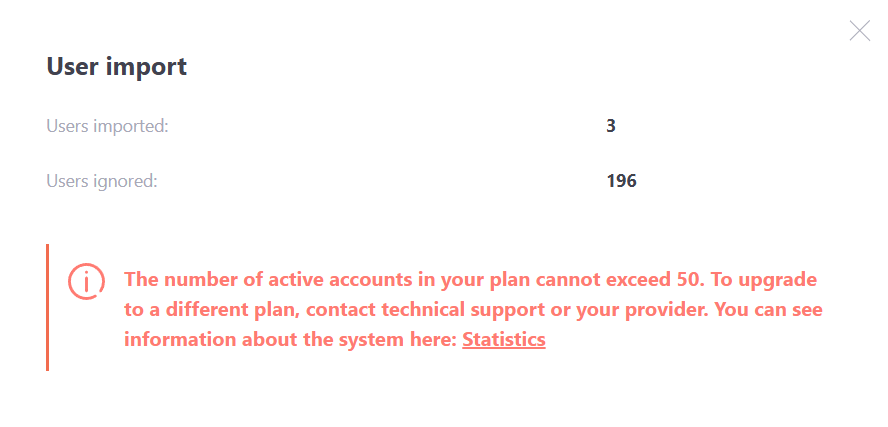
If the number of users in the CSV file exceeds the allowed limit, the system will display a notification indicating that the file cannot be imported.
Regular updates
This import mechanism is used to synchronize user records in Collaborator with the records of personnel accounting systems (1C, Hurma, People Force and others).
Rules of data import and updating:
-
If a new employee appears in the file - a new account will be created in the Collaborator system with the corresponding data.
-
If you change data in the file for an employee, for example, last name, e-mail, login, position, etc., the same data will be changed in the corresponding account in the system. The correspondence of the user is set by the identifier, which is set in the first column of the file data.
-
If the user changes their login or email, the import file will replace them with their login and email values.
In order not to change the e-mail or login that the user enters themselves when importing, you need to enable the portal parameter ( is performed by the Technical Support):- Do not overwrite the changed user's email during import
- Do not overwrite the changed user's login during import
When using the "Do not overwrite modified user email on import" setting, the email as an exception can be changed for users who have a test email address @test.me indicated in the system.
-
User password is not overwritten when imported.
-
Also, the information in the Birthday and Phone number fields is not replaced with a blank value after import, if these data are missing in the file
During import new users will be added, dismissed employees will be blocked, and for existing personal data will be automatically checked and updated.
All changes during re-import of users are displayed in the form of an automatic message after the end of loading the file. It is necessary to make sure that the number of added changes in the import file coincides with the numbers in this message. If there are any mismatches, most likely errors were made while editing the import file.
Import of users works in synchronization mode. It is sufficient to organize the unloading of data from these systems into a text file of CSV format. This format is supported by almost all common personnel accounting systems.
All changes are saved in the import protocol (Protocol import users). This allows you to track job changes, department changes, and changes in the personal data of employees. At any time, the protocol, as well as any other tabular data in Collaborator, can be uploaded in Excel format:
